Here’s a consolidated list of all the Apple M-series chips released and their features
Most of the information was retrieved from different sources so there might be tiny error in the information provided below. Please refer to official websites for more accurate information
Xcode 14 beta, Apple’s IDE (Integrated Development Environment) has gotten so many tools with super powers. The addition of SwiftUI will dramatically change the spectrum of Apple developers in the days to come. The supercharged design tool that comes along with SwiftUI would empower a whole new way to build user interfaces.
Step 1 – Get Xcode 14 beta from Apple developer’s page
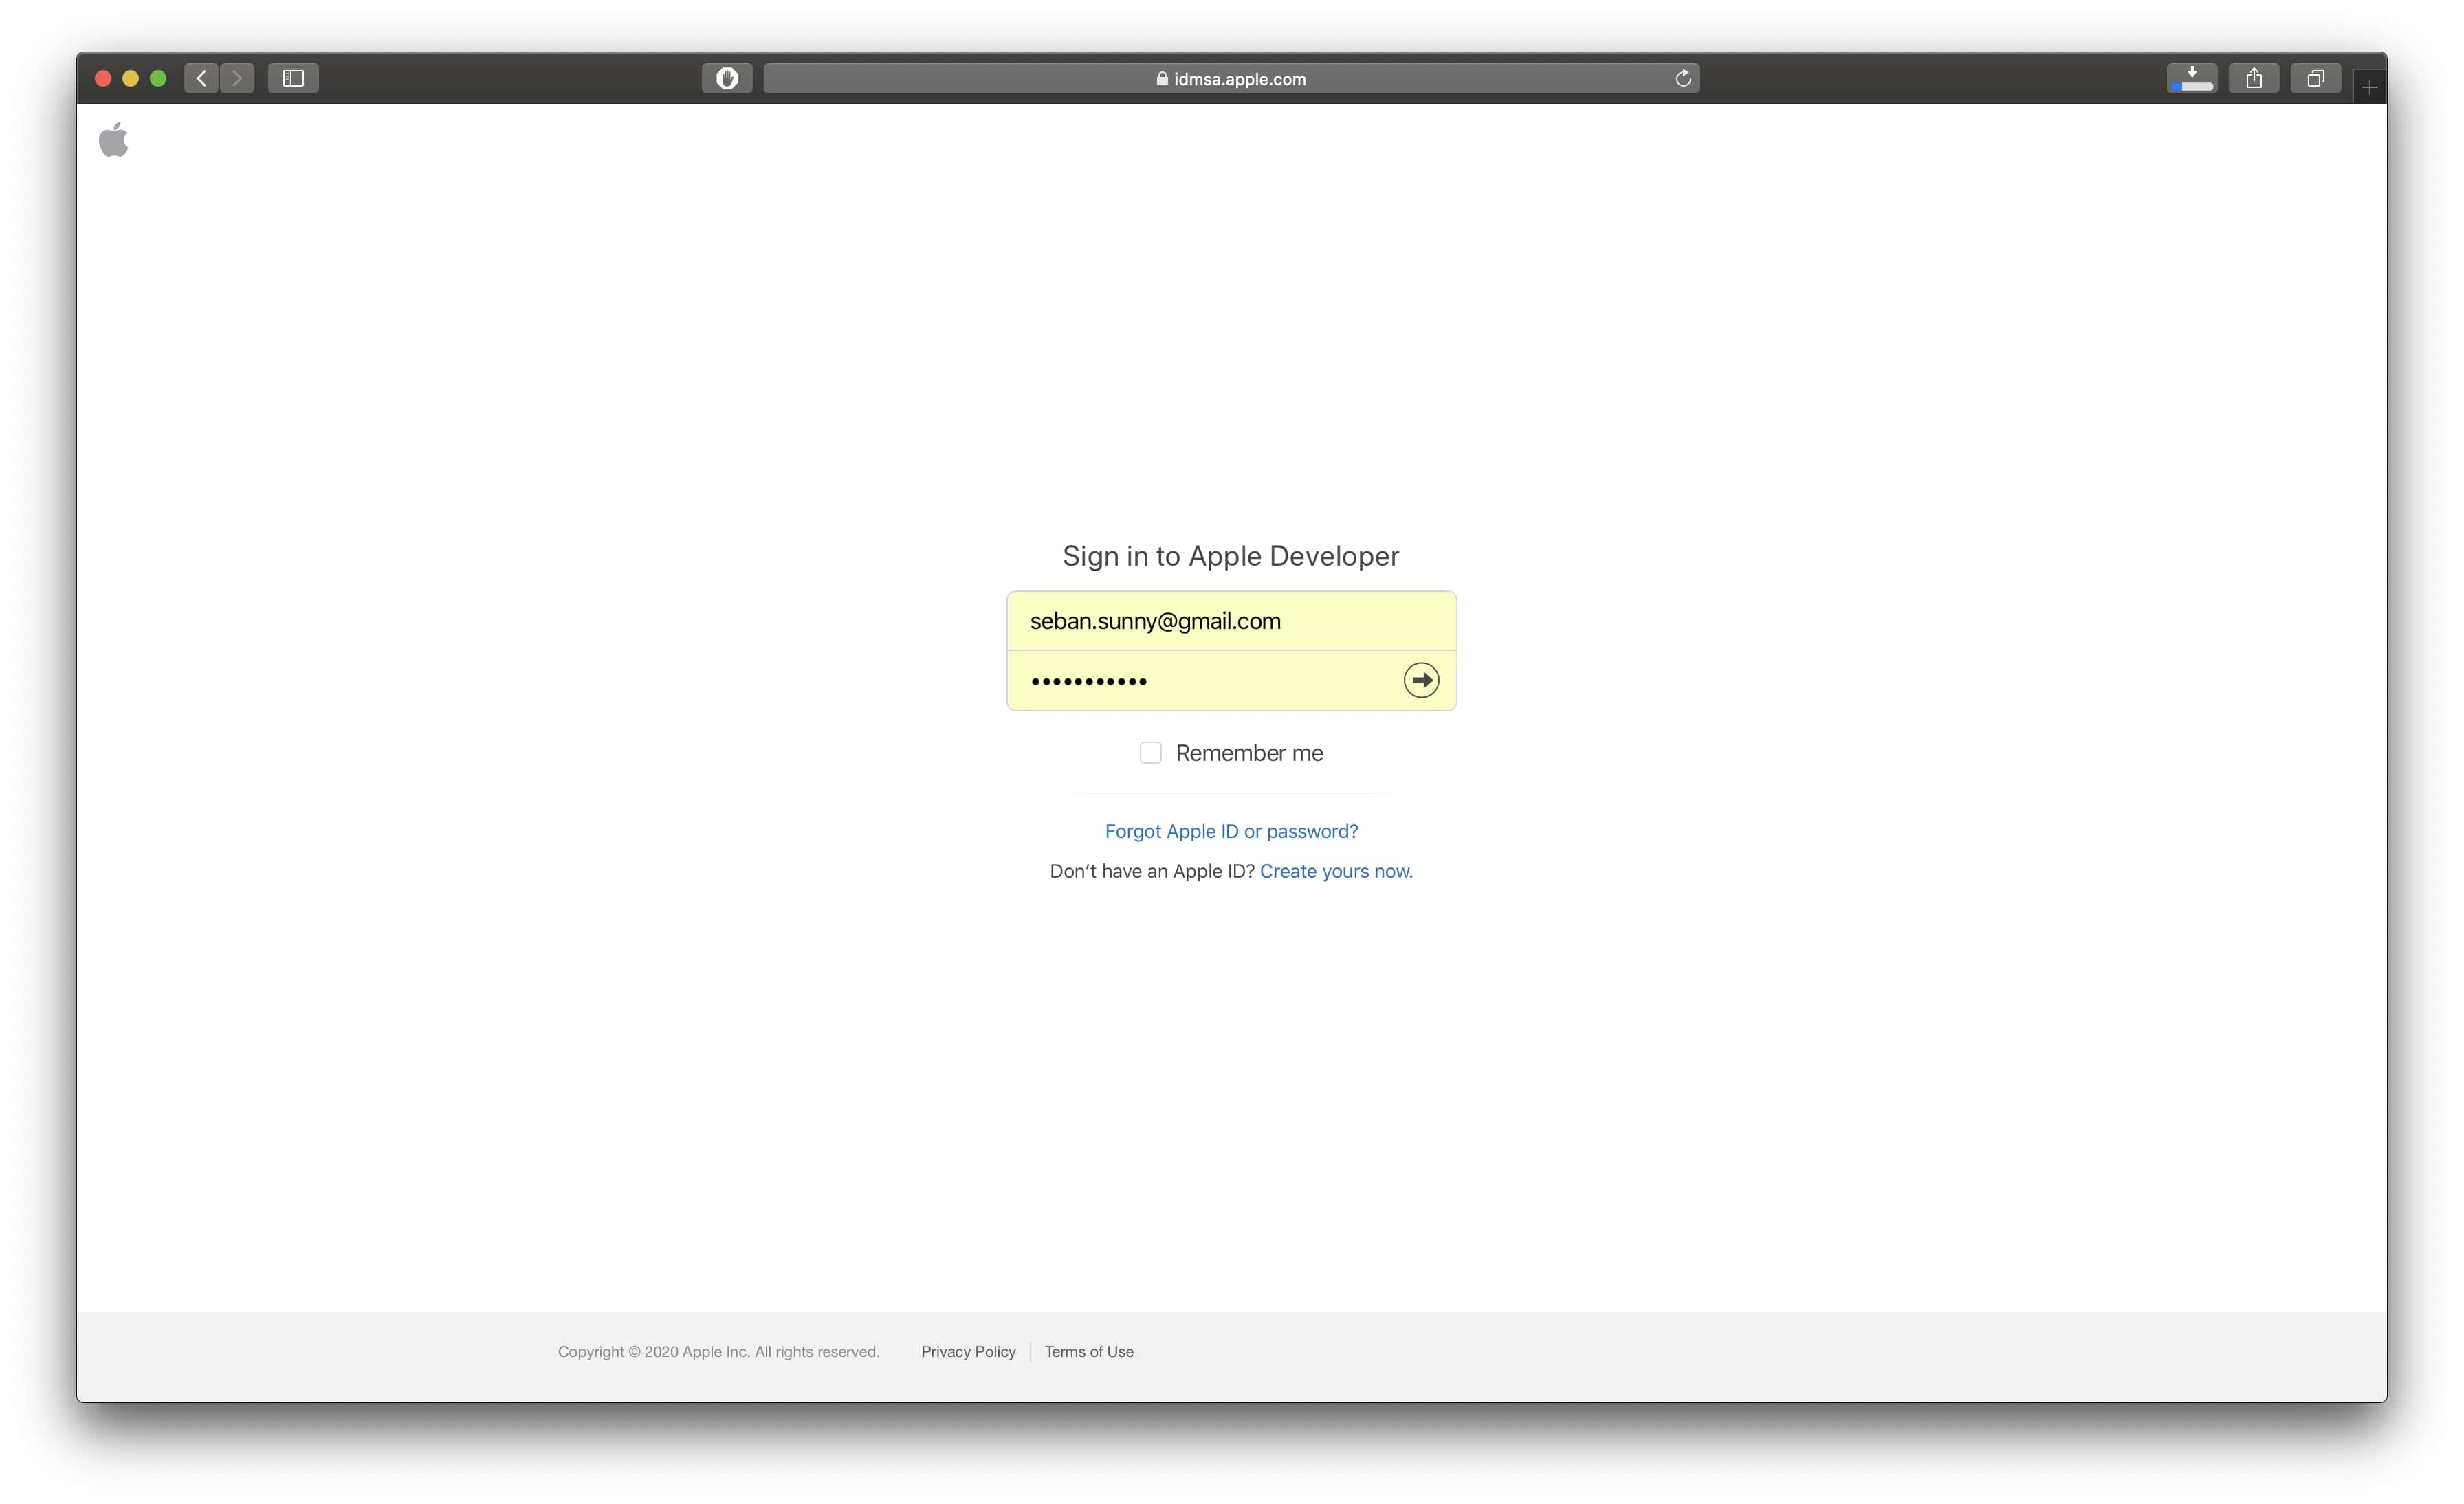
Let’s head to Apple’s developer login page by clicking on this link. Login with your default Apple ID and password
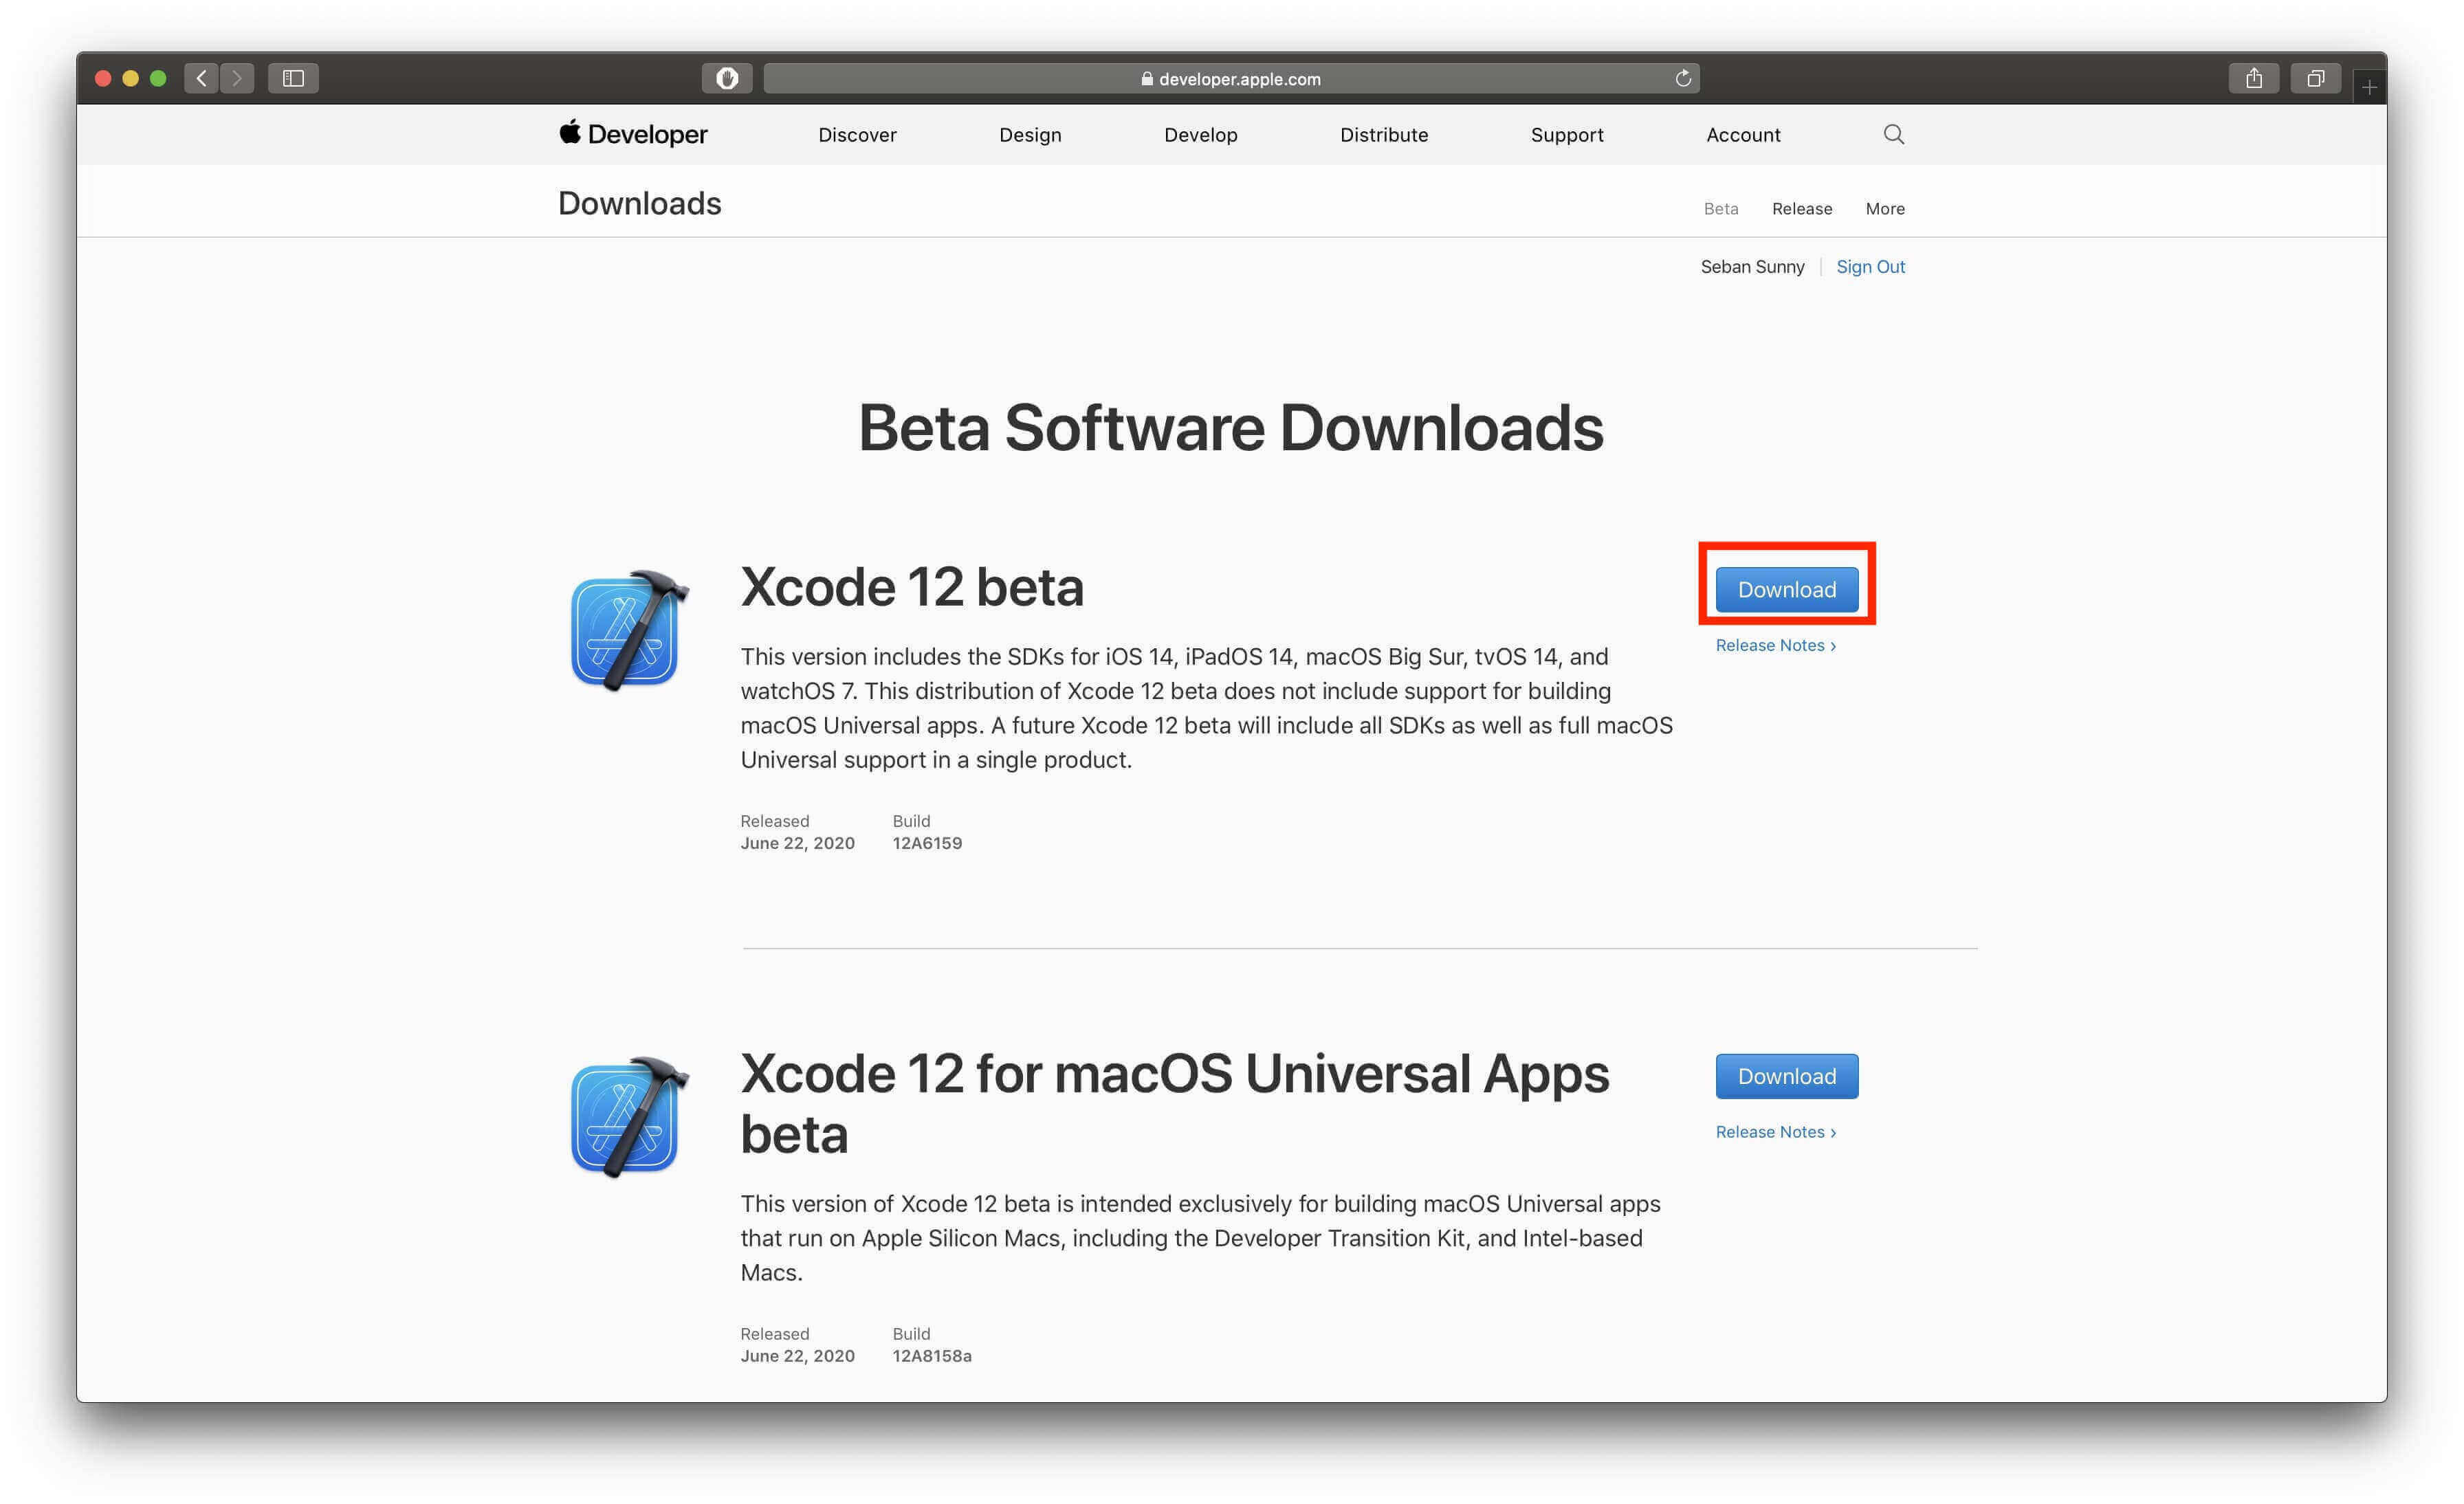
Once you have logged in successfully, you would be redirected to the actual downloads page. If you have not subscribed to the Apple Developer’s Annual plan; you would end up seeing an option to just download the beta version of Xcode 14 as seen in the screenshot below.
Click on the blue button to the right which say “DownloadXcode 14 beta“.
Now begins the long wait to download the application (depending on your internet speed), the file size is about 7.28GB.
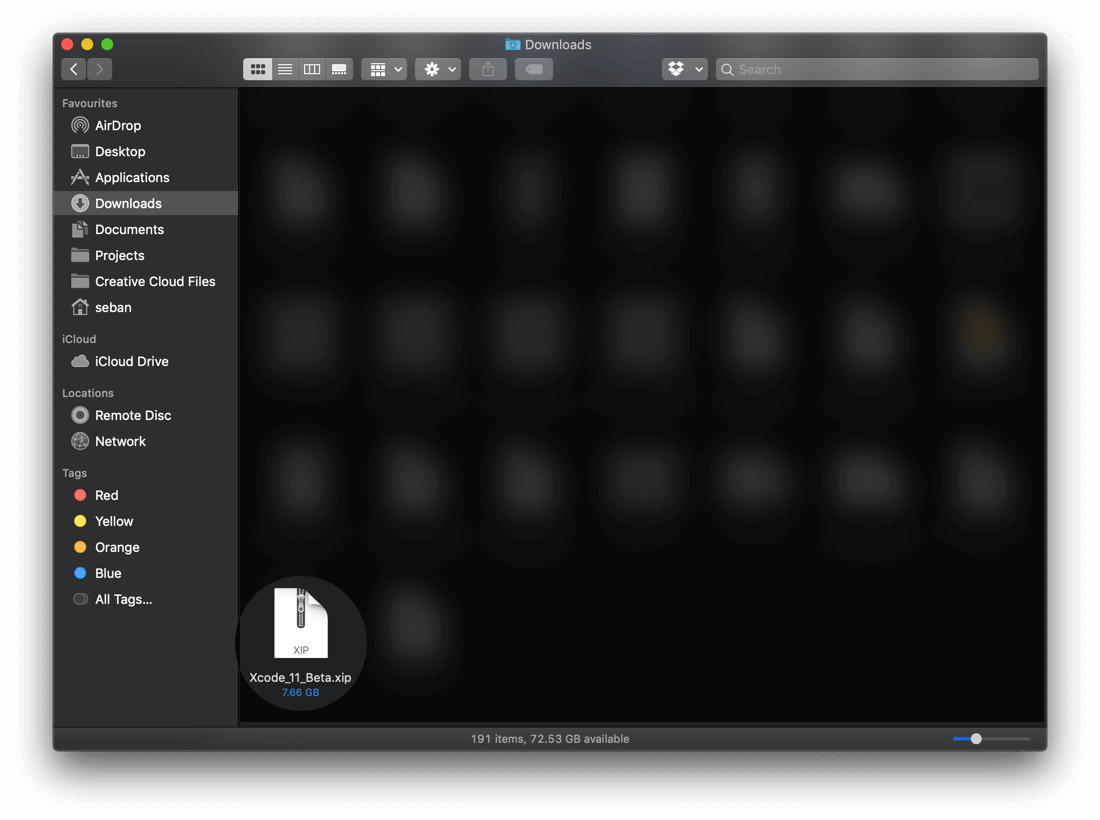
Once the file is downloaded, open the file or head to your “Downloads” folder to see the zip file and double click on the file.
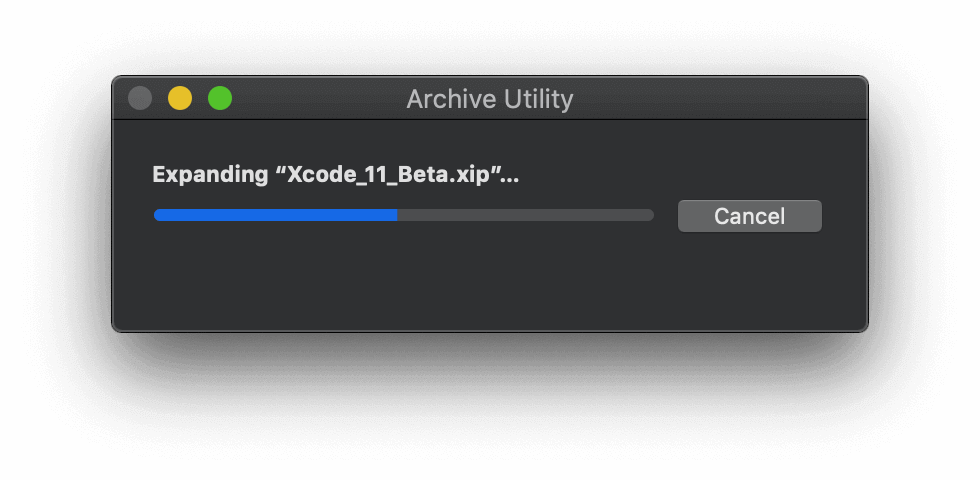
Just a heads up, the unzipping process is going to take some time.
Step 2 – Install Xcode 14 beta
Installing Xcode 14 beta or any other application in macOS is a breeze.
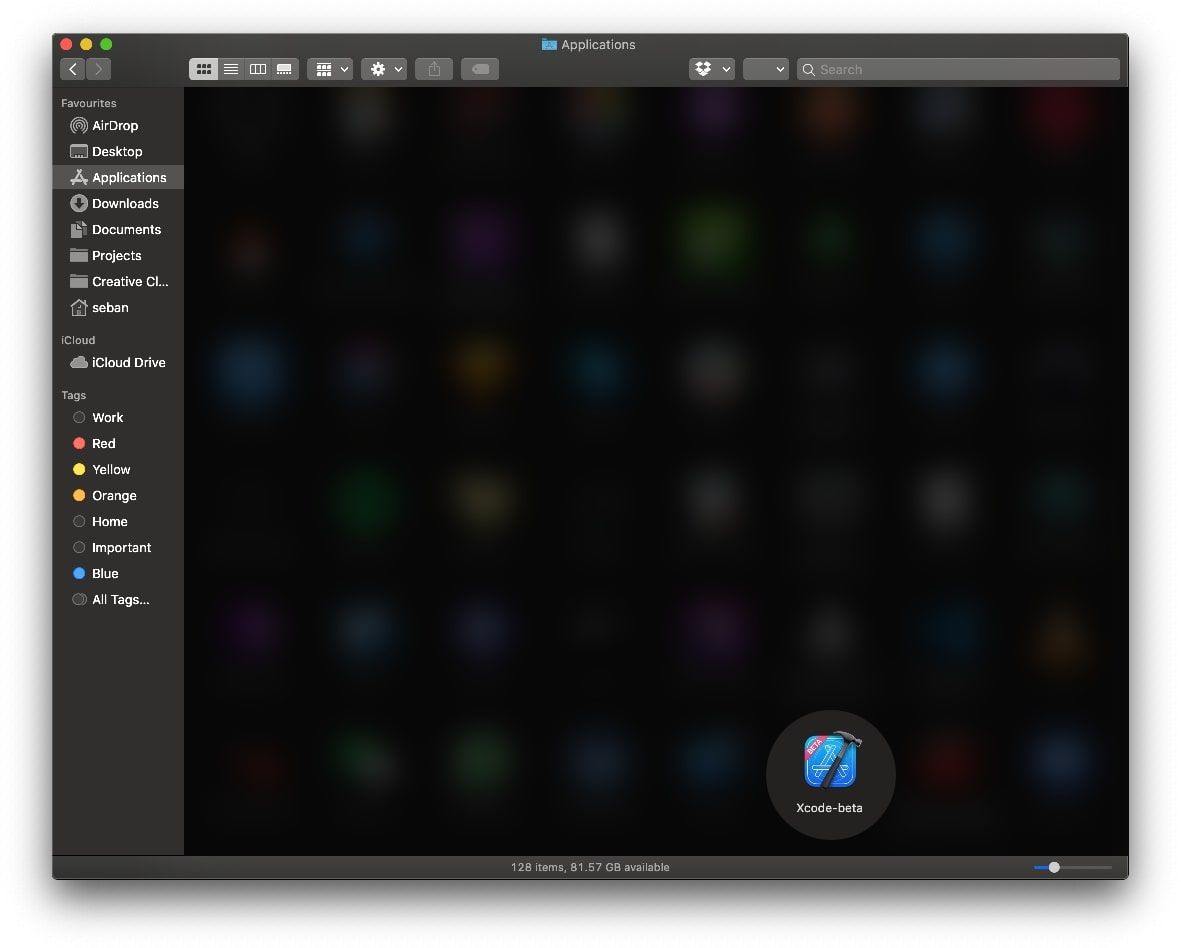
Drag and drop the Xcode beta app icon from the “Downloads” folder to the “Applications” folder. That’s it!
Step 3 – Launch Xcode 14 beta
The excitement of trying out something new is unexplainable. Let’s go ahead and launch the new Xcode beta app.
There so many ways to open the app.
Go to your “Application” folder and double click on the “Xcode-beta” app icon
Open “LaunchPad” and double click on the “Xcode 14 beta” app icon
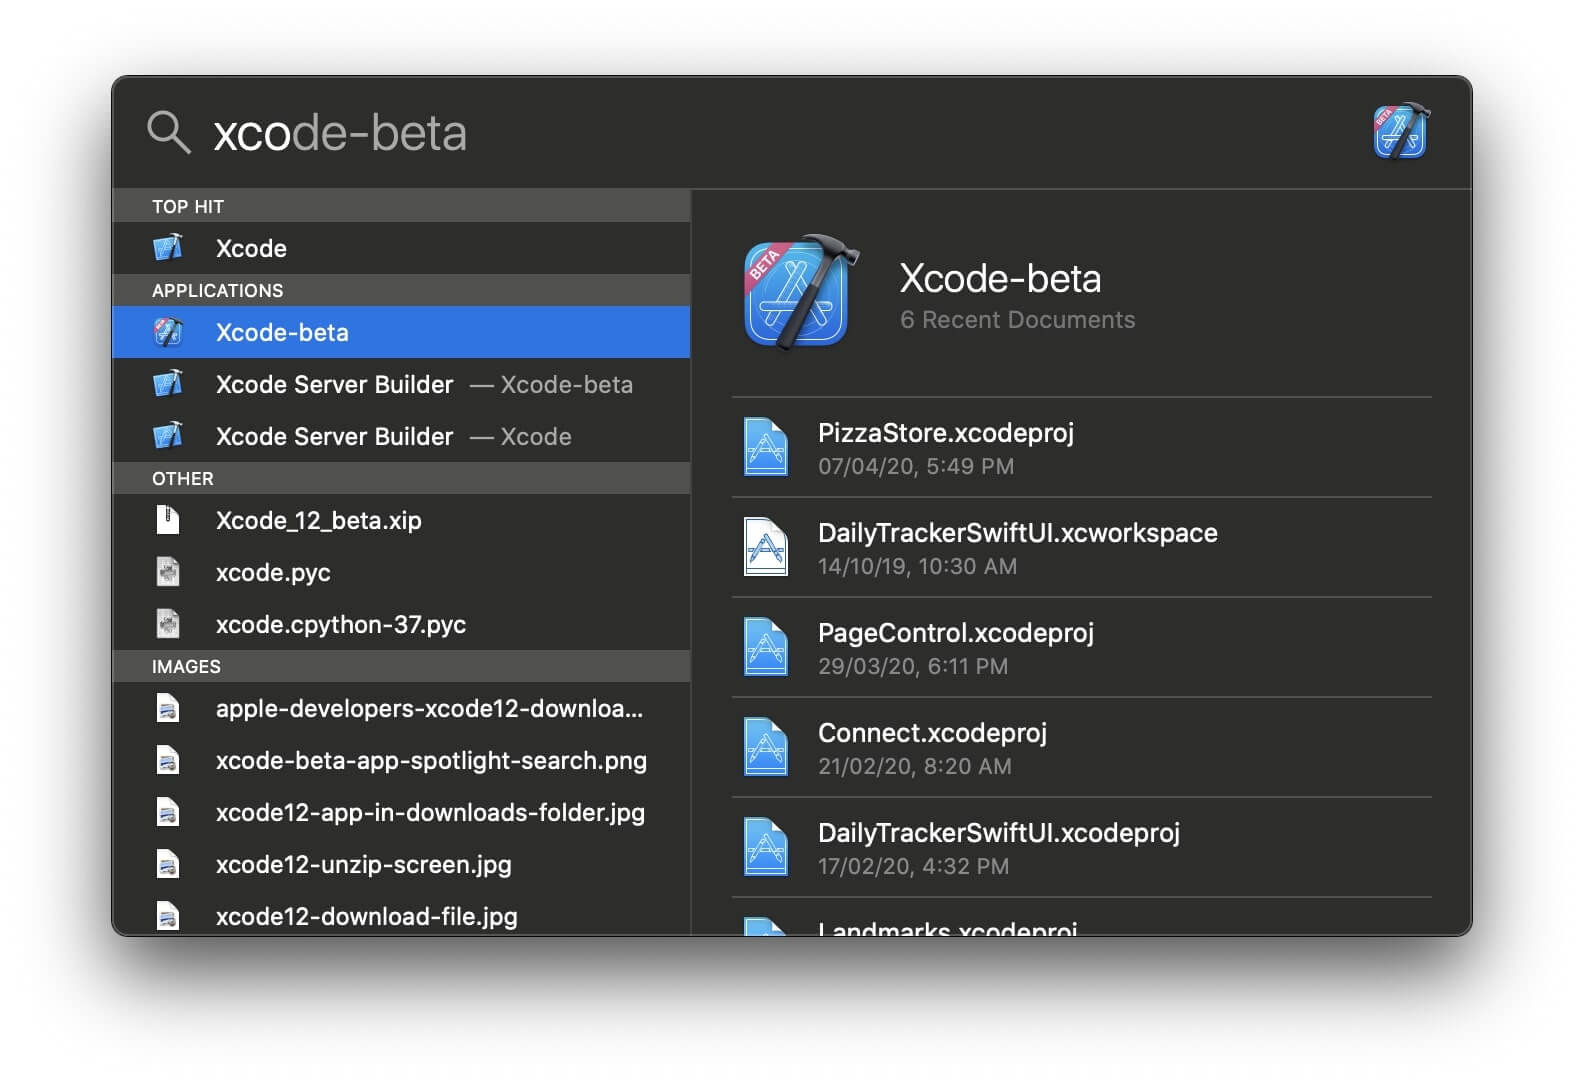
Open “Spotlight” search and type “Xcode” and select the Xcode beta option
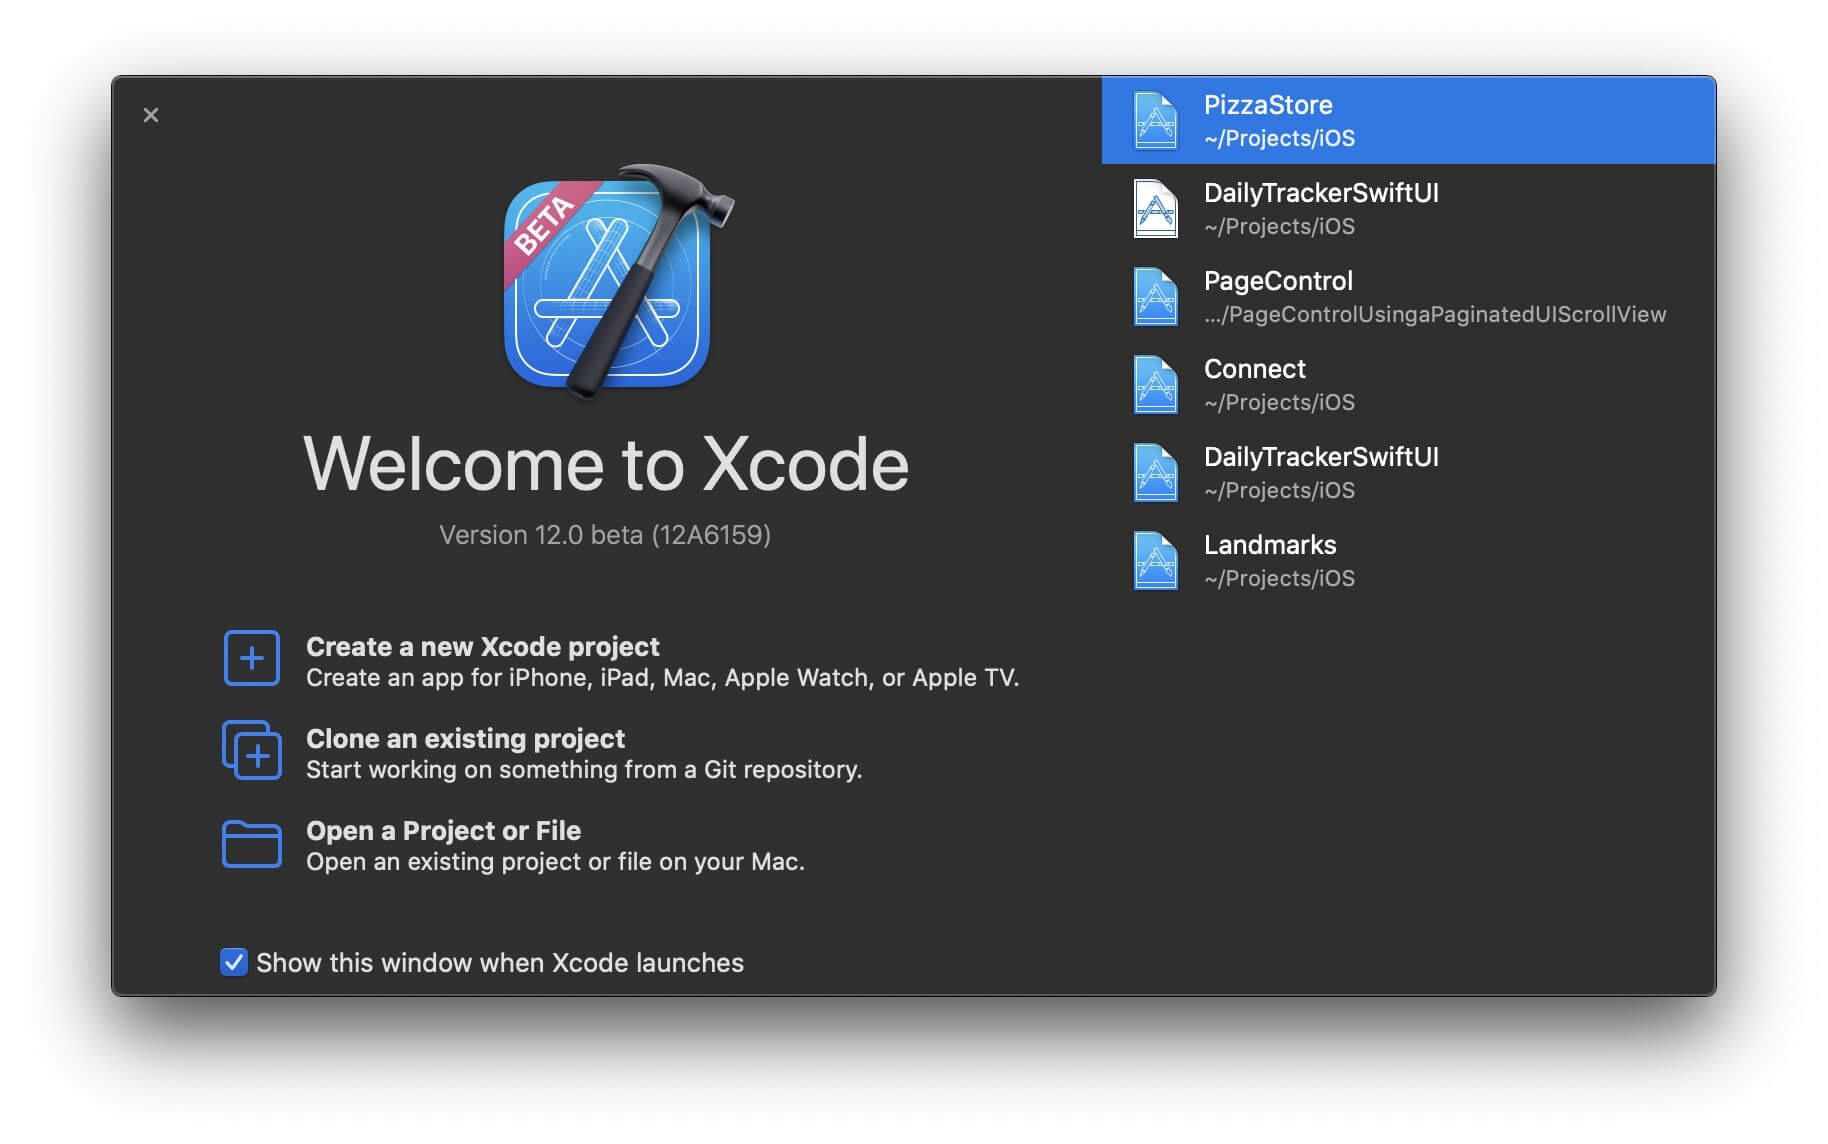
Once you run the app, you should see the Xcode and iOS SDK License Agreement window. Once, you’ve read and clicked on the “Agree” button you should see the landing screen that let’s install the SDKs you need.
There are couple of ways to get the Simulator running, few of them are:
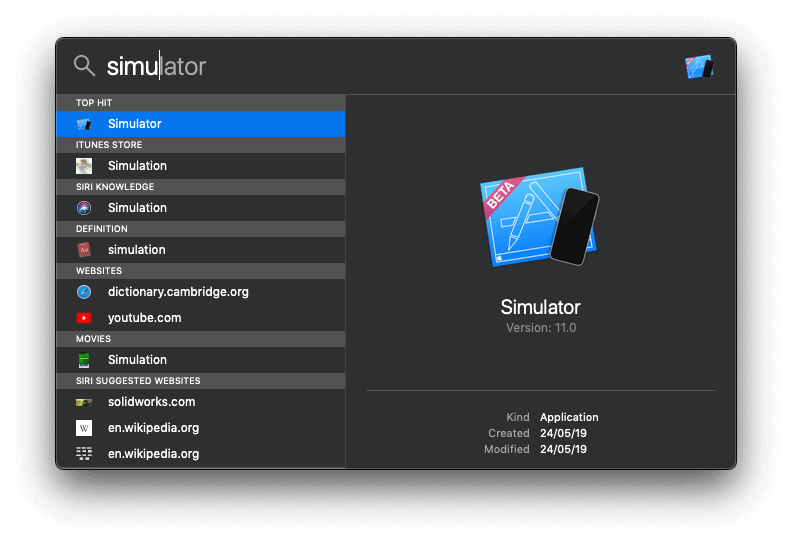
Open “Spotlight” search and type “Simulator” and select the Simulator app option in the ‘Top Hits’. Please do make sure it’s the Simulator version 11 or up.
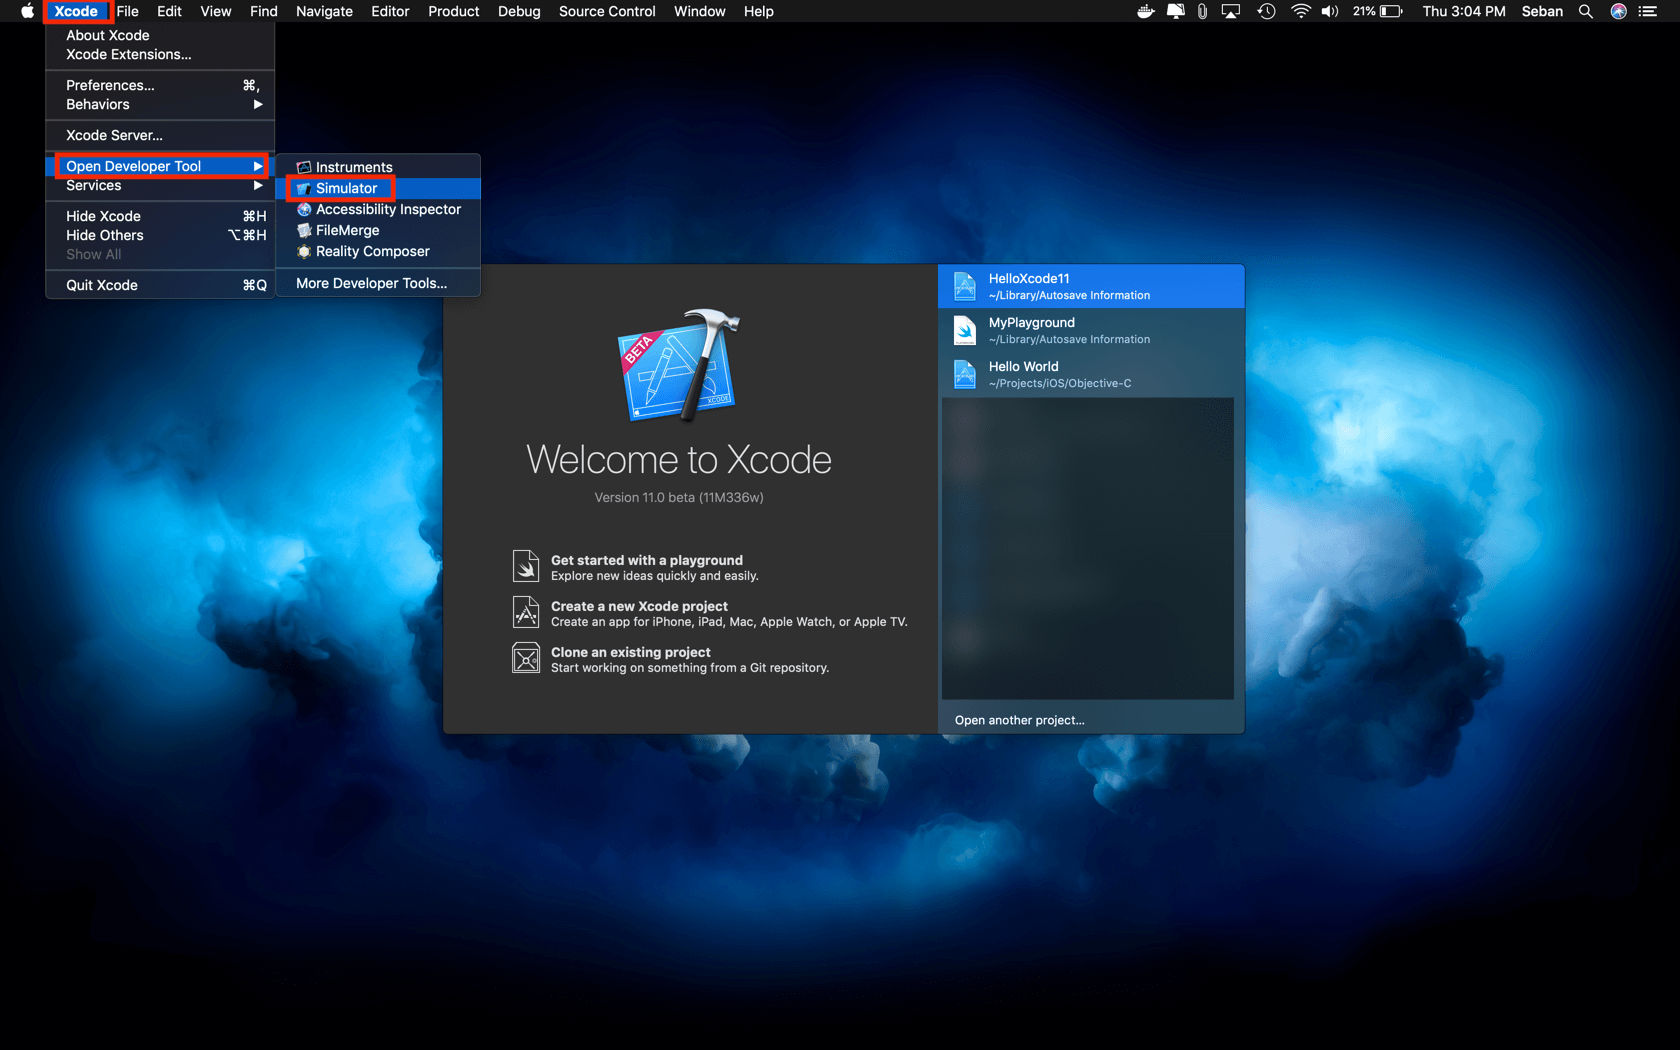
Launch the new Xcode 11 beta; hover the mouse pointer on the “Xcode” option in the menu bar located to on upper left part of your Mac window. Hover or select the the “Open Developer Tool” option. Finally, click on the “Simulator” option as shown in screen shot below.
Step 2: Update Simulator’s device setting
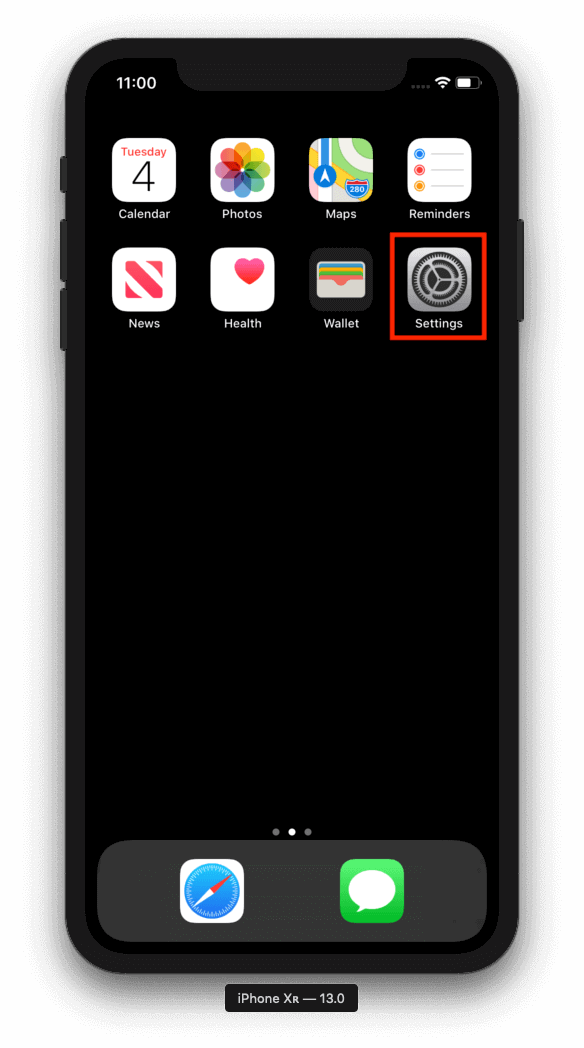
Once, the awesome Simulator has loaded completing, you would end up in a very familiar screen as shown below. Open the “Settings” iOS app (highlighted in red in the image below) in the Simulator.
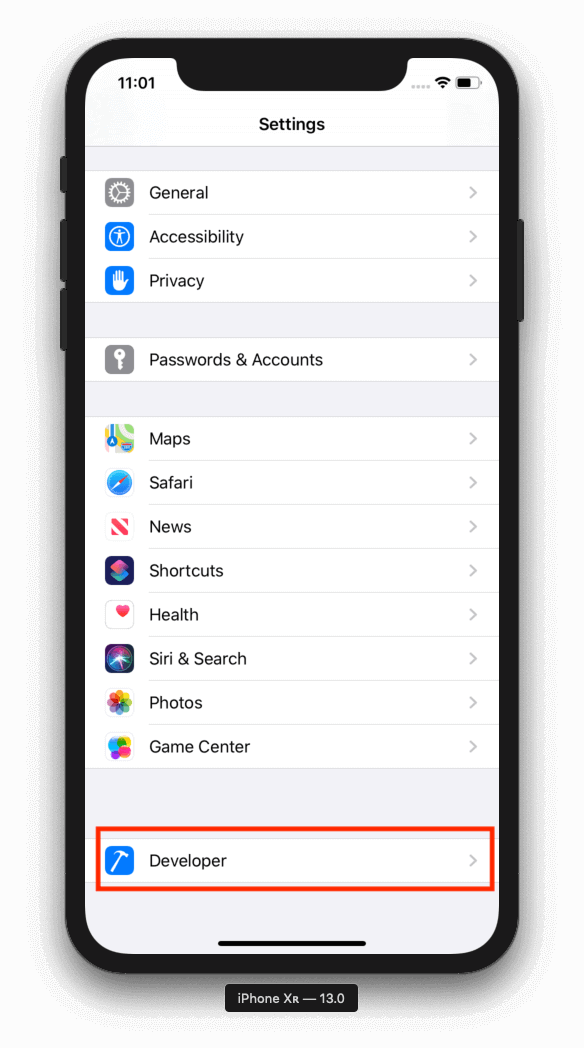
Once the Settings app is launched, scroll down to the end to see the option for “Developer” (highlighted in red in the image below), it has hammer icon in blue to its left.
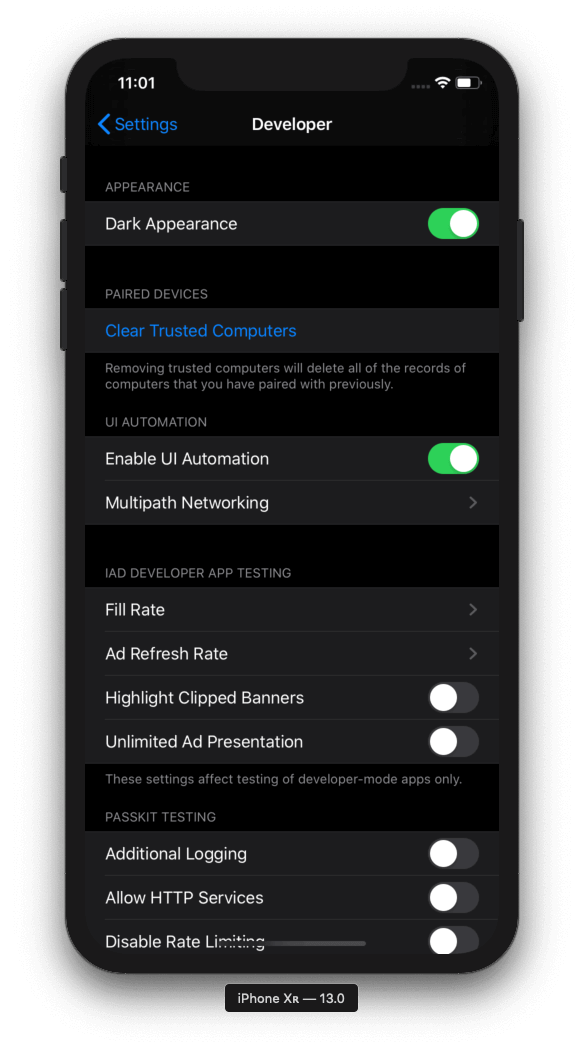
Finally, toggle the switch for the first option which says “Dark Appearance” (highlighted in red in the image below) under the “Appearance” section.
Step 3: Dark mode ON!!!
Voila, there you have it. iOS 13 Simulator with “Dark mode” on.
Feel free to take a look at the new iOS 13 features with this link.
The best way to debug websites on iOS and iPadOS devices/simulators is by using the developer tools in Safari.
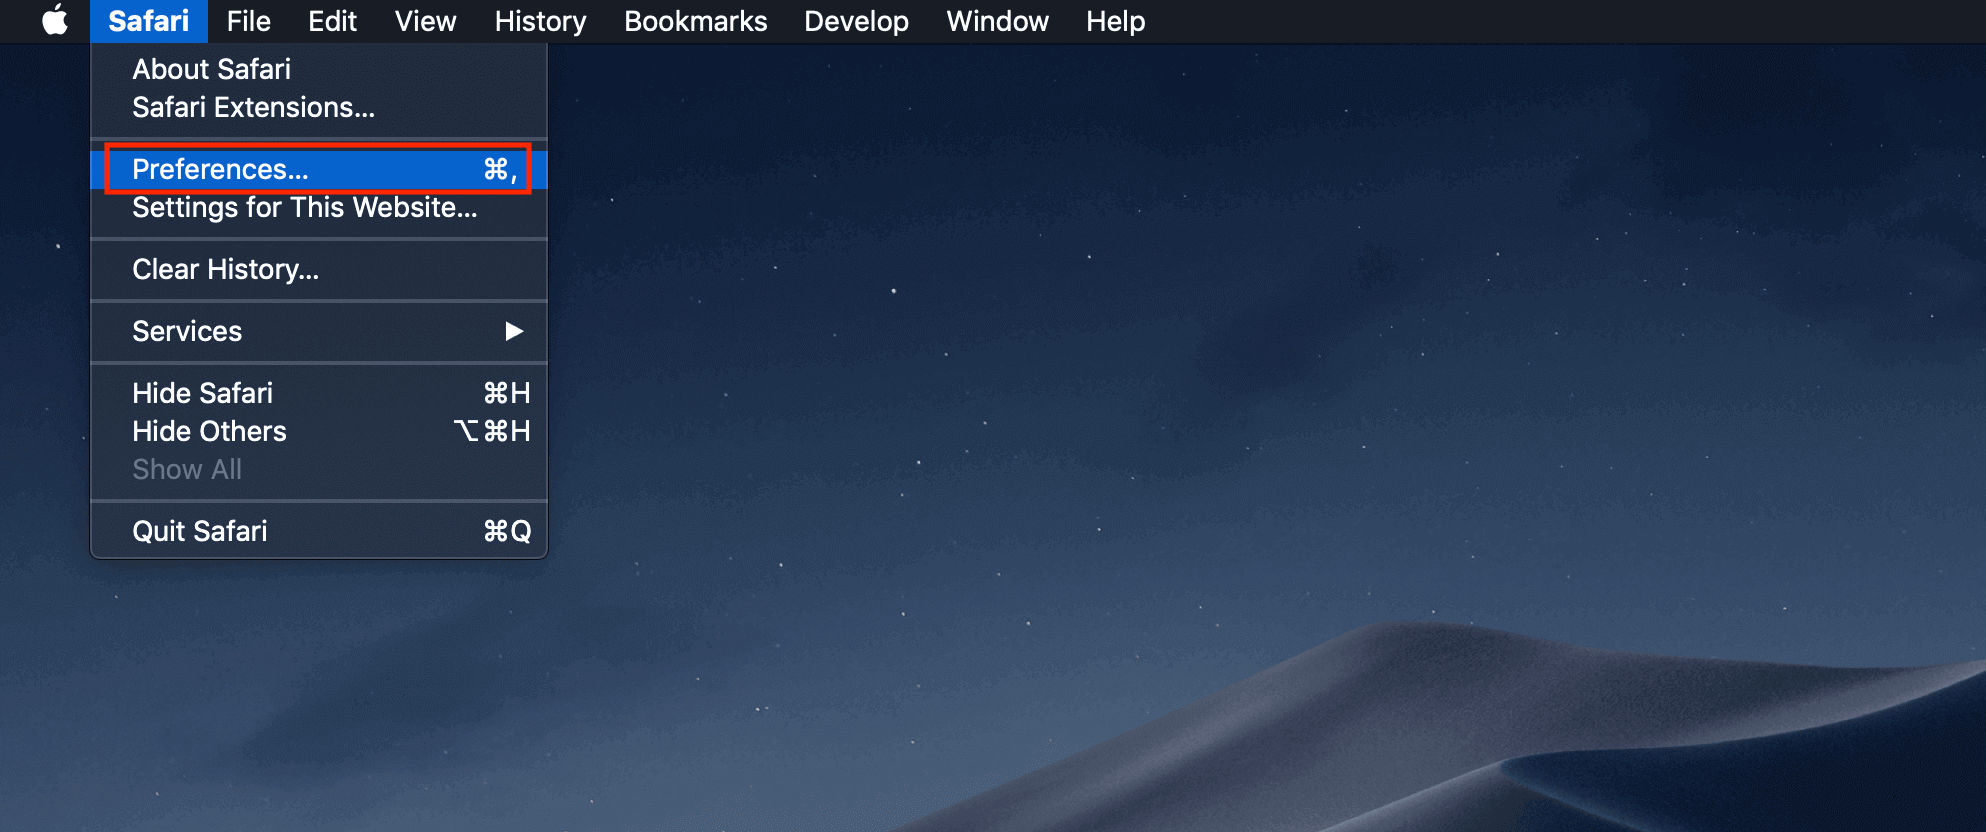
Step 1: Enable “Develop” menu for Safari on your Mac.
Essentially, this is the first step irrespective of which device/simulator you would be using.
On your Mac, launch Safari and head over to Safari (menu option) > Preferences. Make sure you are on the “Advanced” tab.
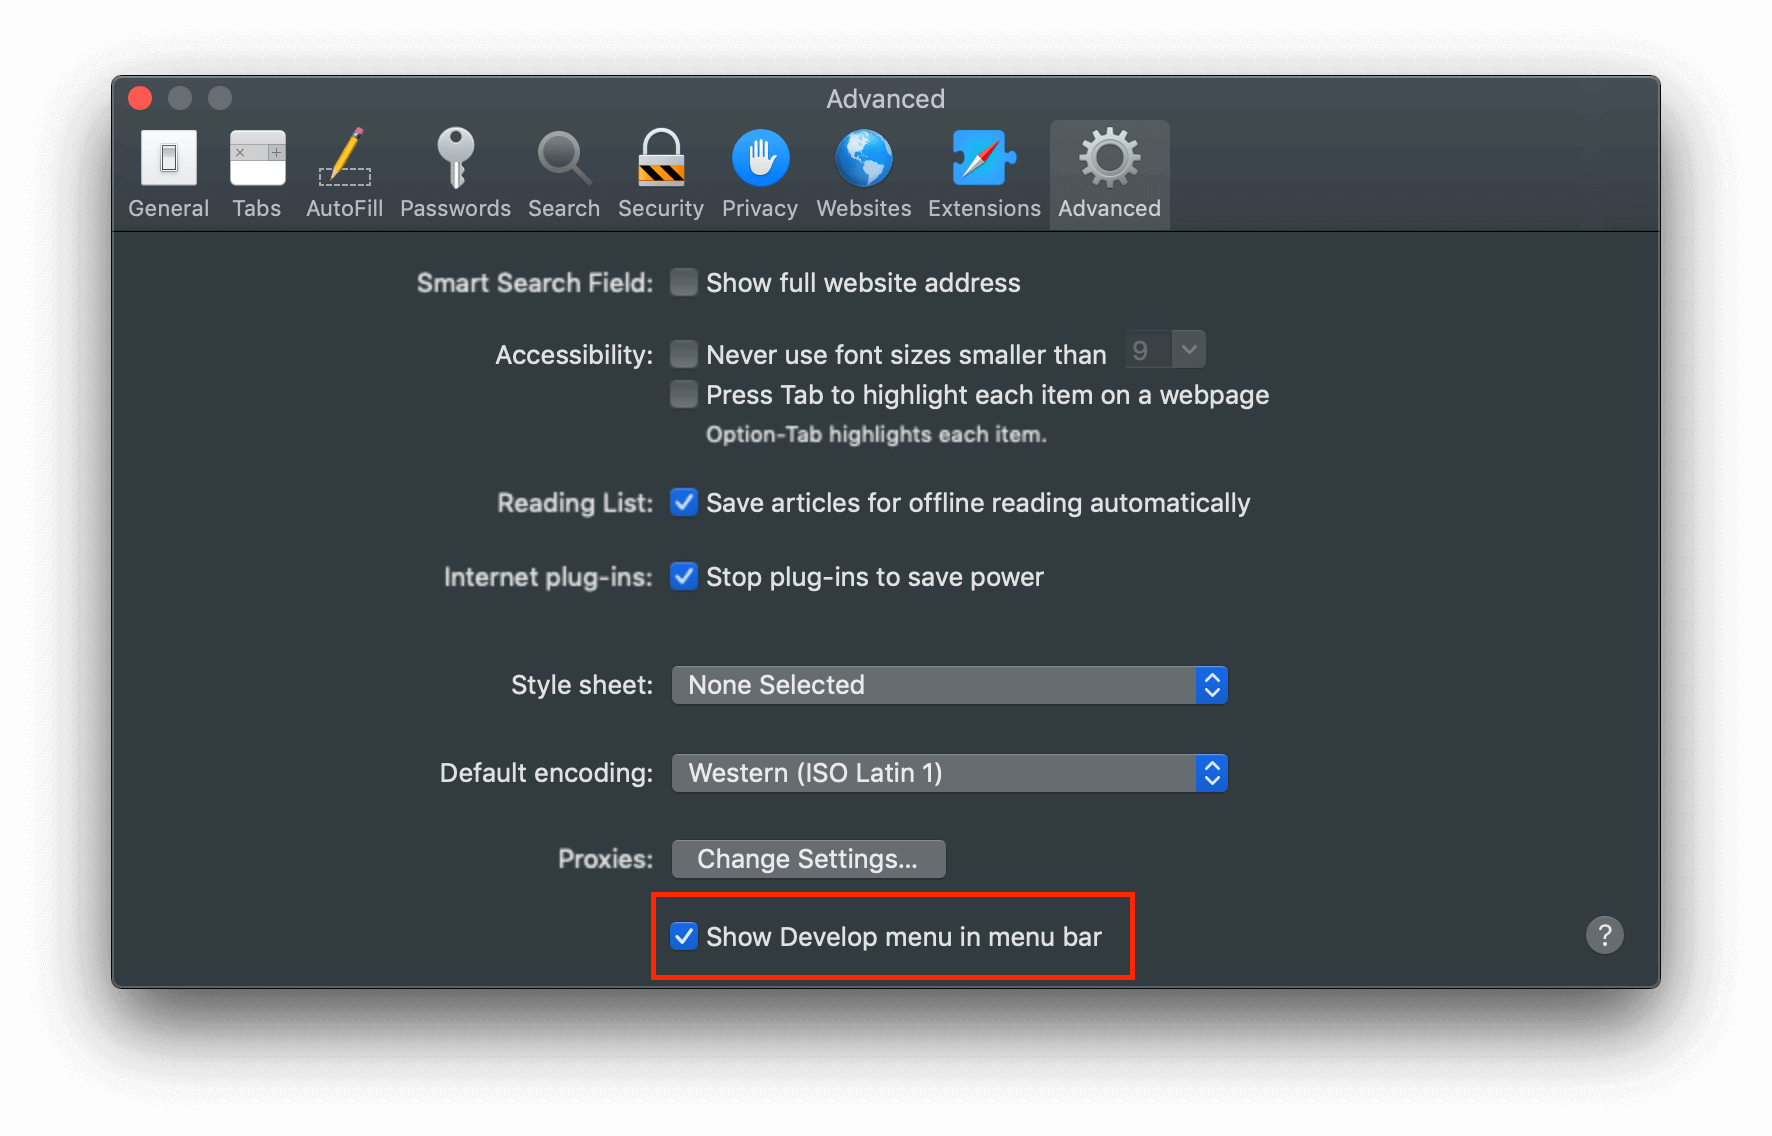
At the bottom, you would see a checkbox which says: “Show Develop menu in menu bar“, make sure it’s checked.
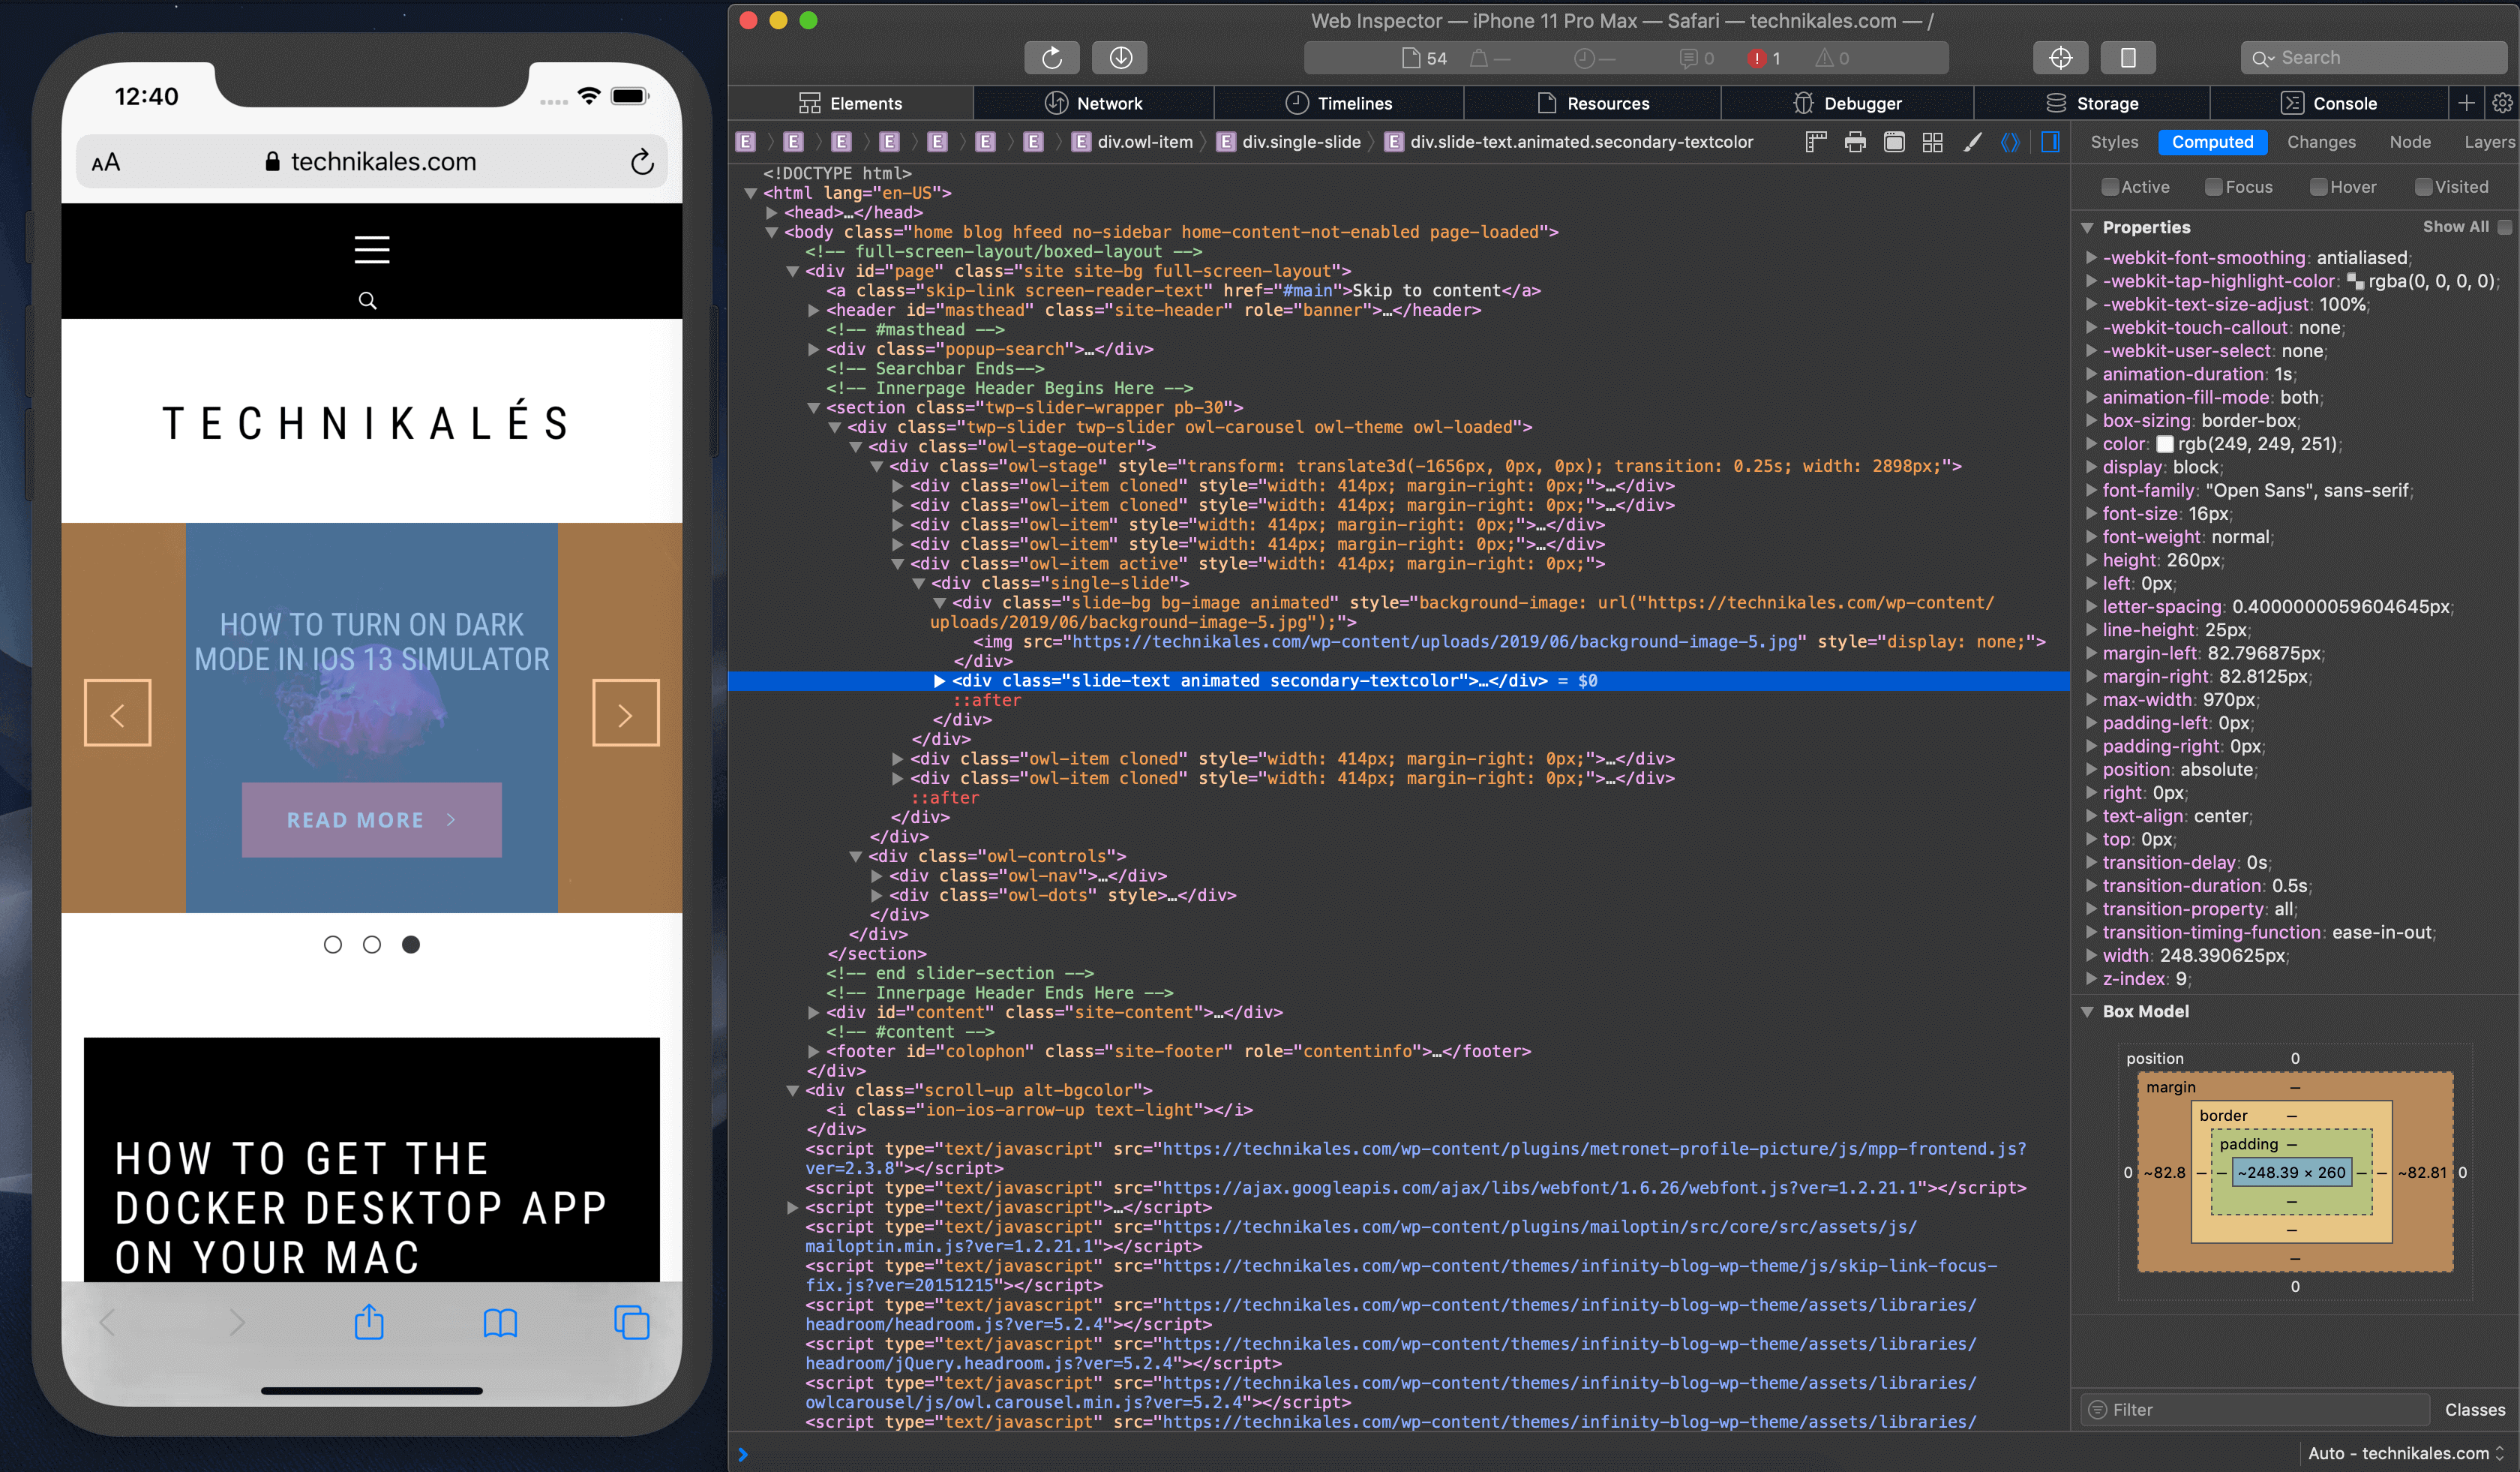
Step 2: Open a website in Safari on an iOS/iPadOS device or Simulator
When using a Simulator to debug the website, open the Safari app and load the website.
Step 3: Launching the debugger tool in Safari
Once you’ve loaded the website on your iOS/iPadOS device or Simulator, restart Safari. Now, in Safari’s top menu bar head to the option “Develop”, click on it to view all the sections. The section we want is the second one, where you would see the name of the iOS/iPadOS device or the Simulator. Hover over the name to see the loaded application or website and click on it. Refer the image below.
Step 4: Debug Away!
Now you should see the developer tools with all the beautiful HTML, CSS code and all the other goodies.
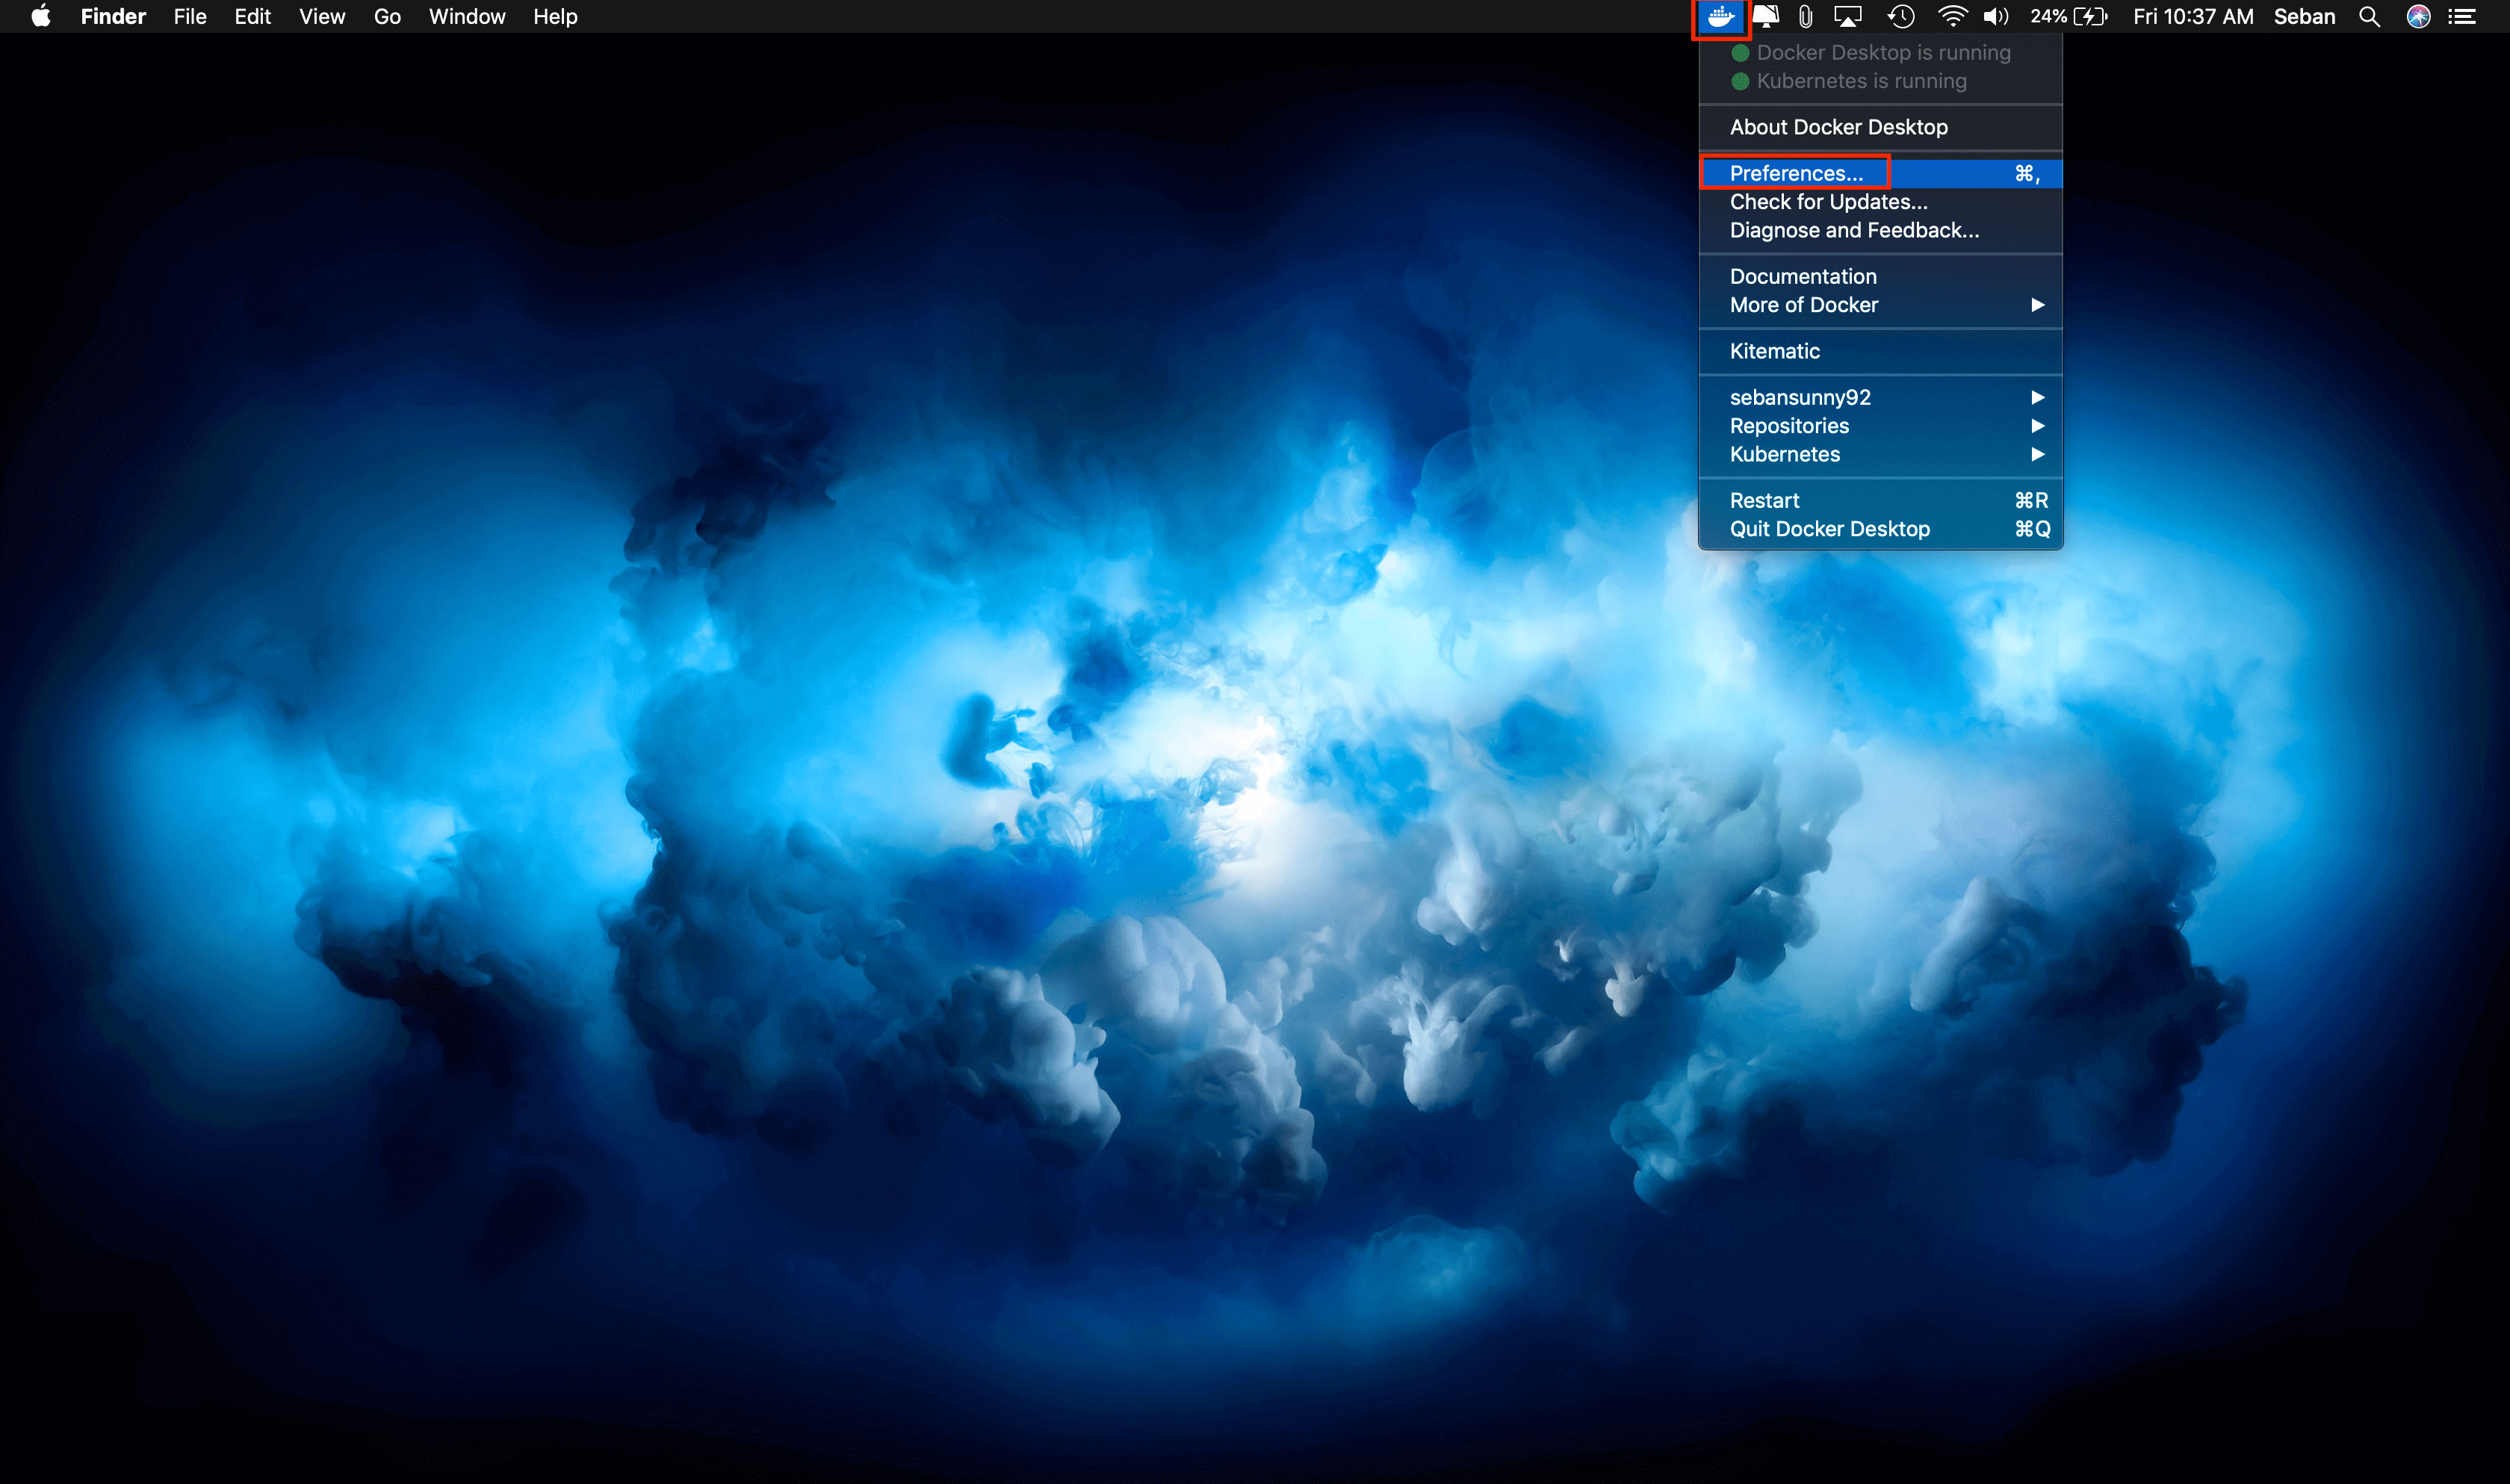
Getting the Docker Desktop app provides everything you need for enterprise-ready Docker container development of Kubernetes-ready applications.
Step 1: Download & install “Docker Desktop” app.
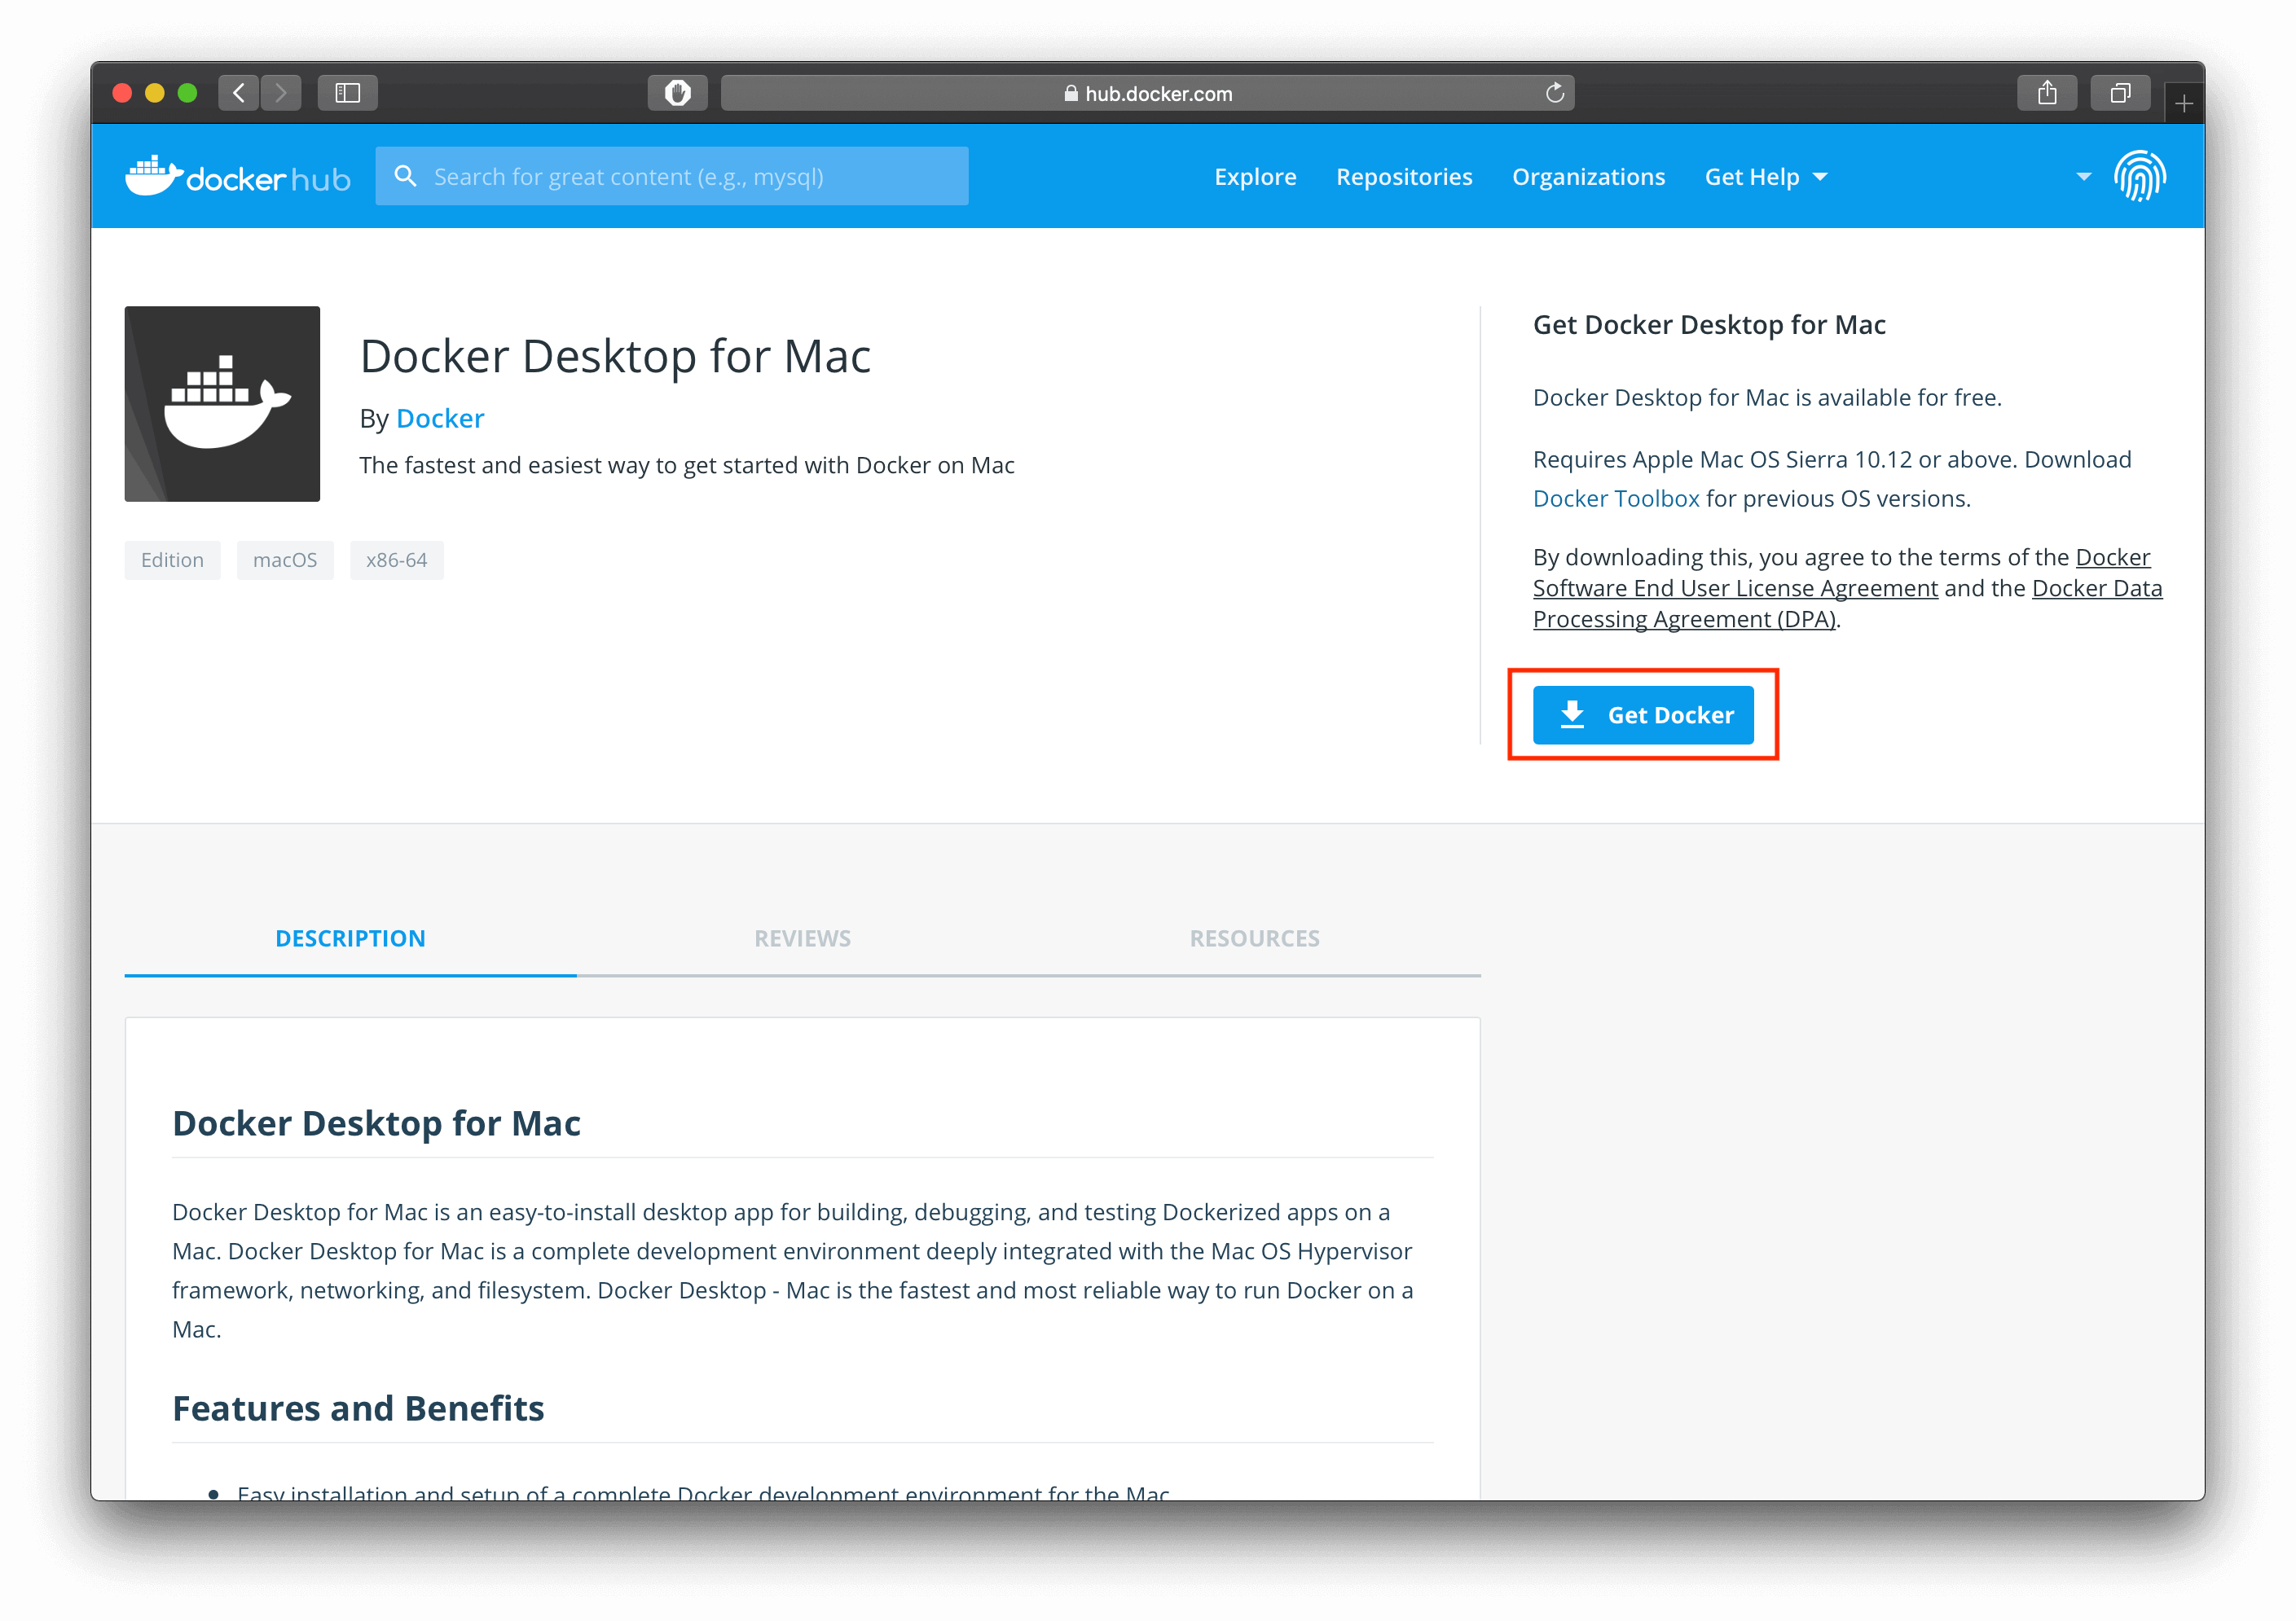
Firstly, you need to have an account in Docker Hub to download the app so click on this link to create one – https://hub.docker.com/signup.
Once you have created your account and logged in to your account, click on this link – https://hub.docker.com/editions/community/docker-ce-desktop-mac. This will get you to the downloads page for the community version of Docker Desktop for macOS devices. Once you are on the downloads page, click on the blue button to the right which says “Get Docker” (highlighted in red in the screen shot below) to download the application.
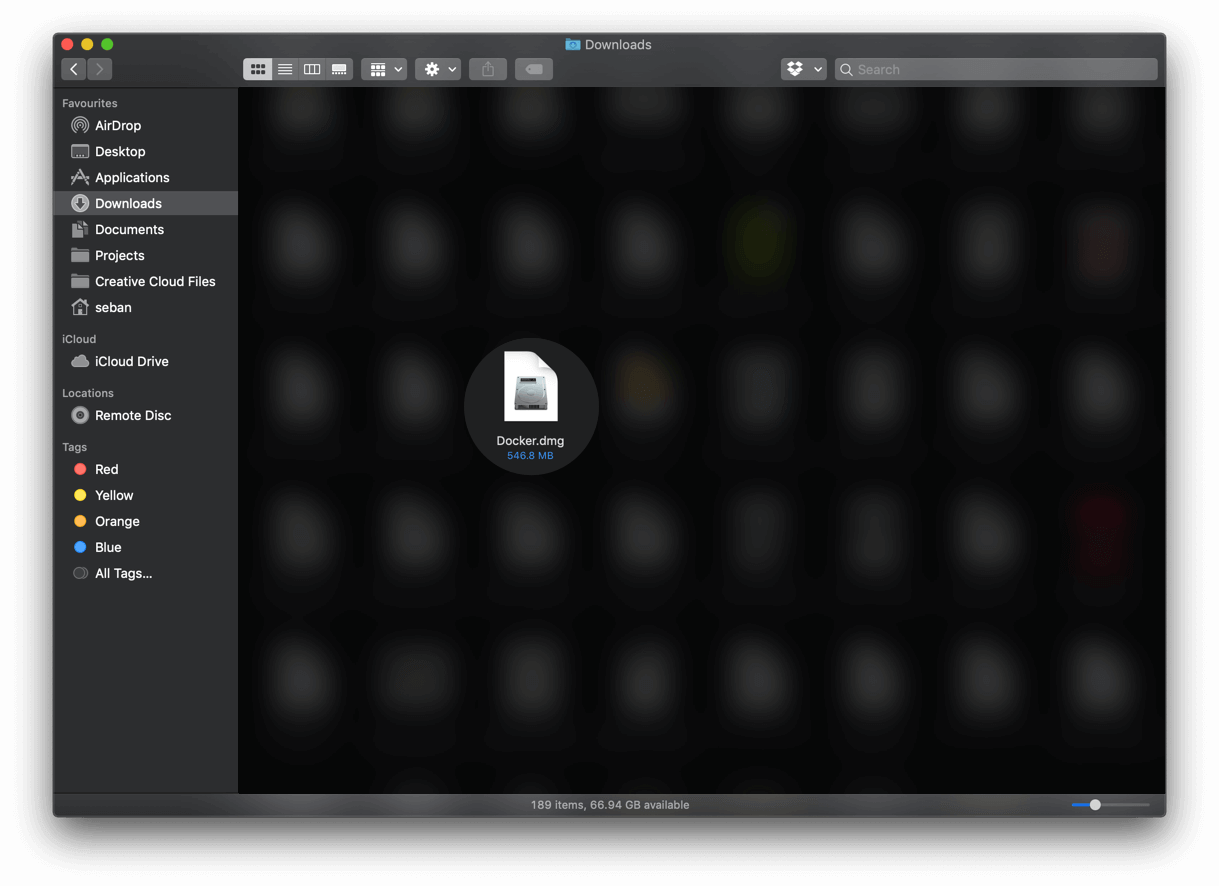
Open the downloaded file. If you are having trouble finding it go to your Downloads folder and look for the Docker Desktop application file as shown in the image below.
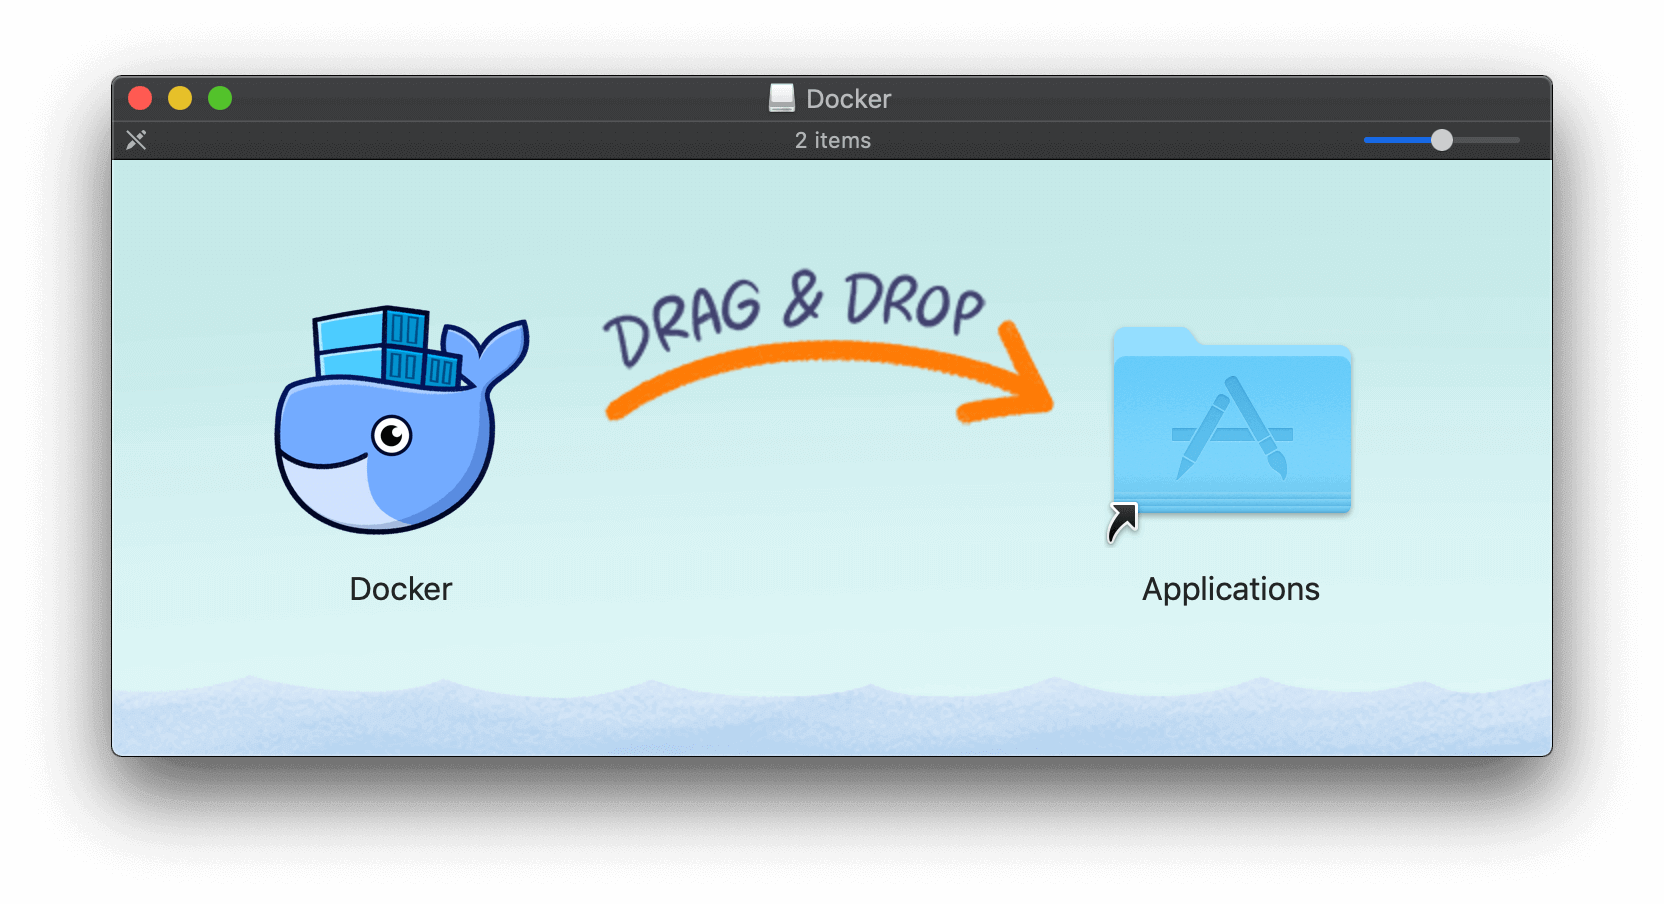
No surprises here, just drag and drop the docker icon to the Applications folder as shown in the image below.
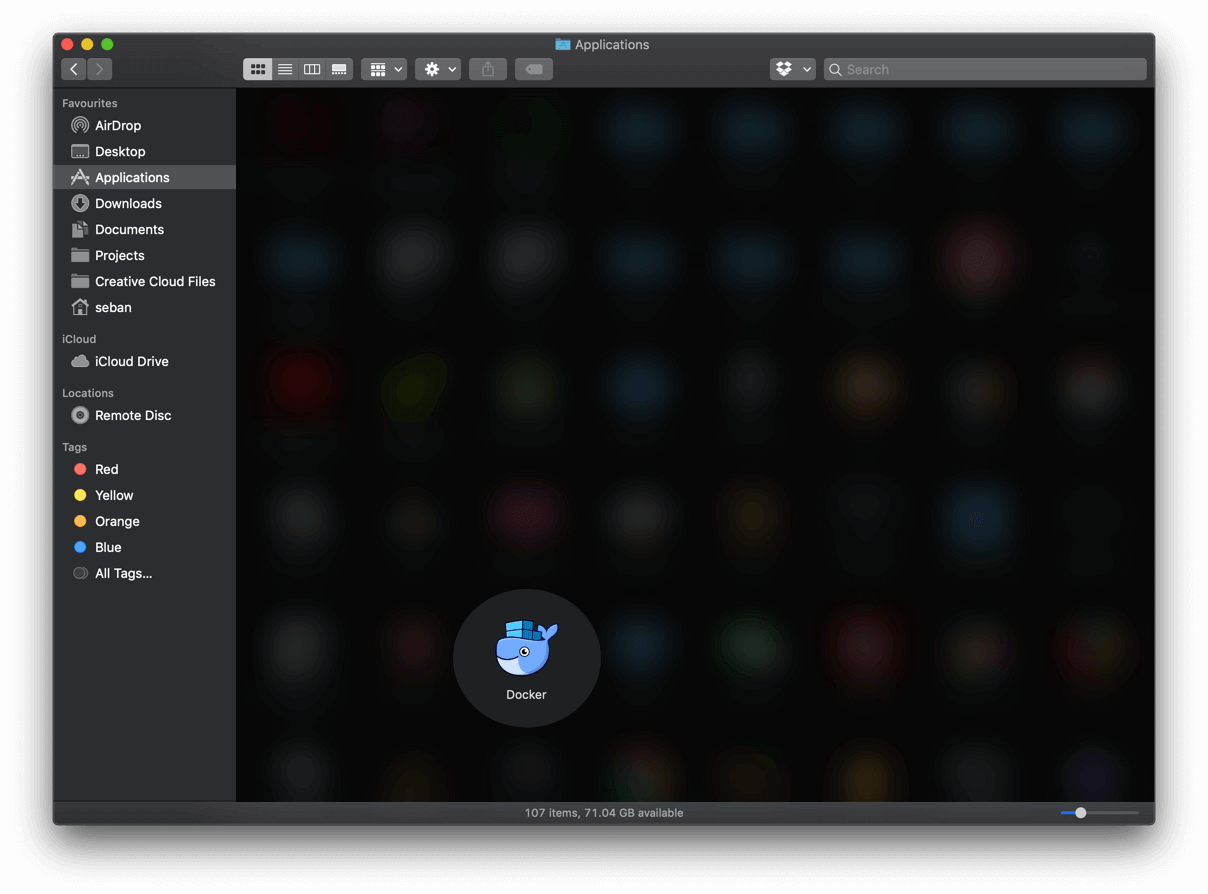
Step 2: Run the Docker Desktop application.
From the Applications folder or LaunchPad or Spotlight Search, run the Docker Desktop application.
Once you have launched the Docker Desktop application, it isn’t directly accessible from Mac’s application dock. It is only accessible from the icon in the top menu bar to the right (refer the screen shot below).
Night Shift is a macOS feature that shifts the colours of your display to the warmer end of the colour spectrum after dark. Studies have shown that exposure to bright blue light in the evening can affect your circadian rhythms and make it harder to fall asleep. Night Shift uses your computer’s clock and geolocation to determine when it’s sunset in your location so it then automatically shifts the colours in your display to the warmer end of the spectrum. In the morning it returns the display to its regular settings.
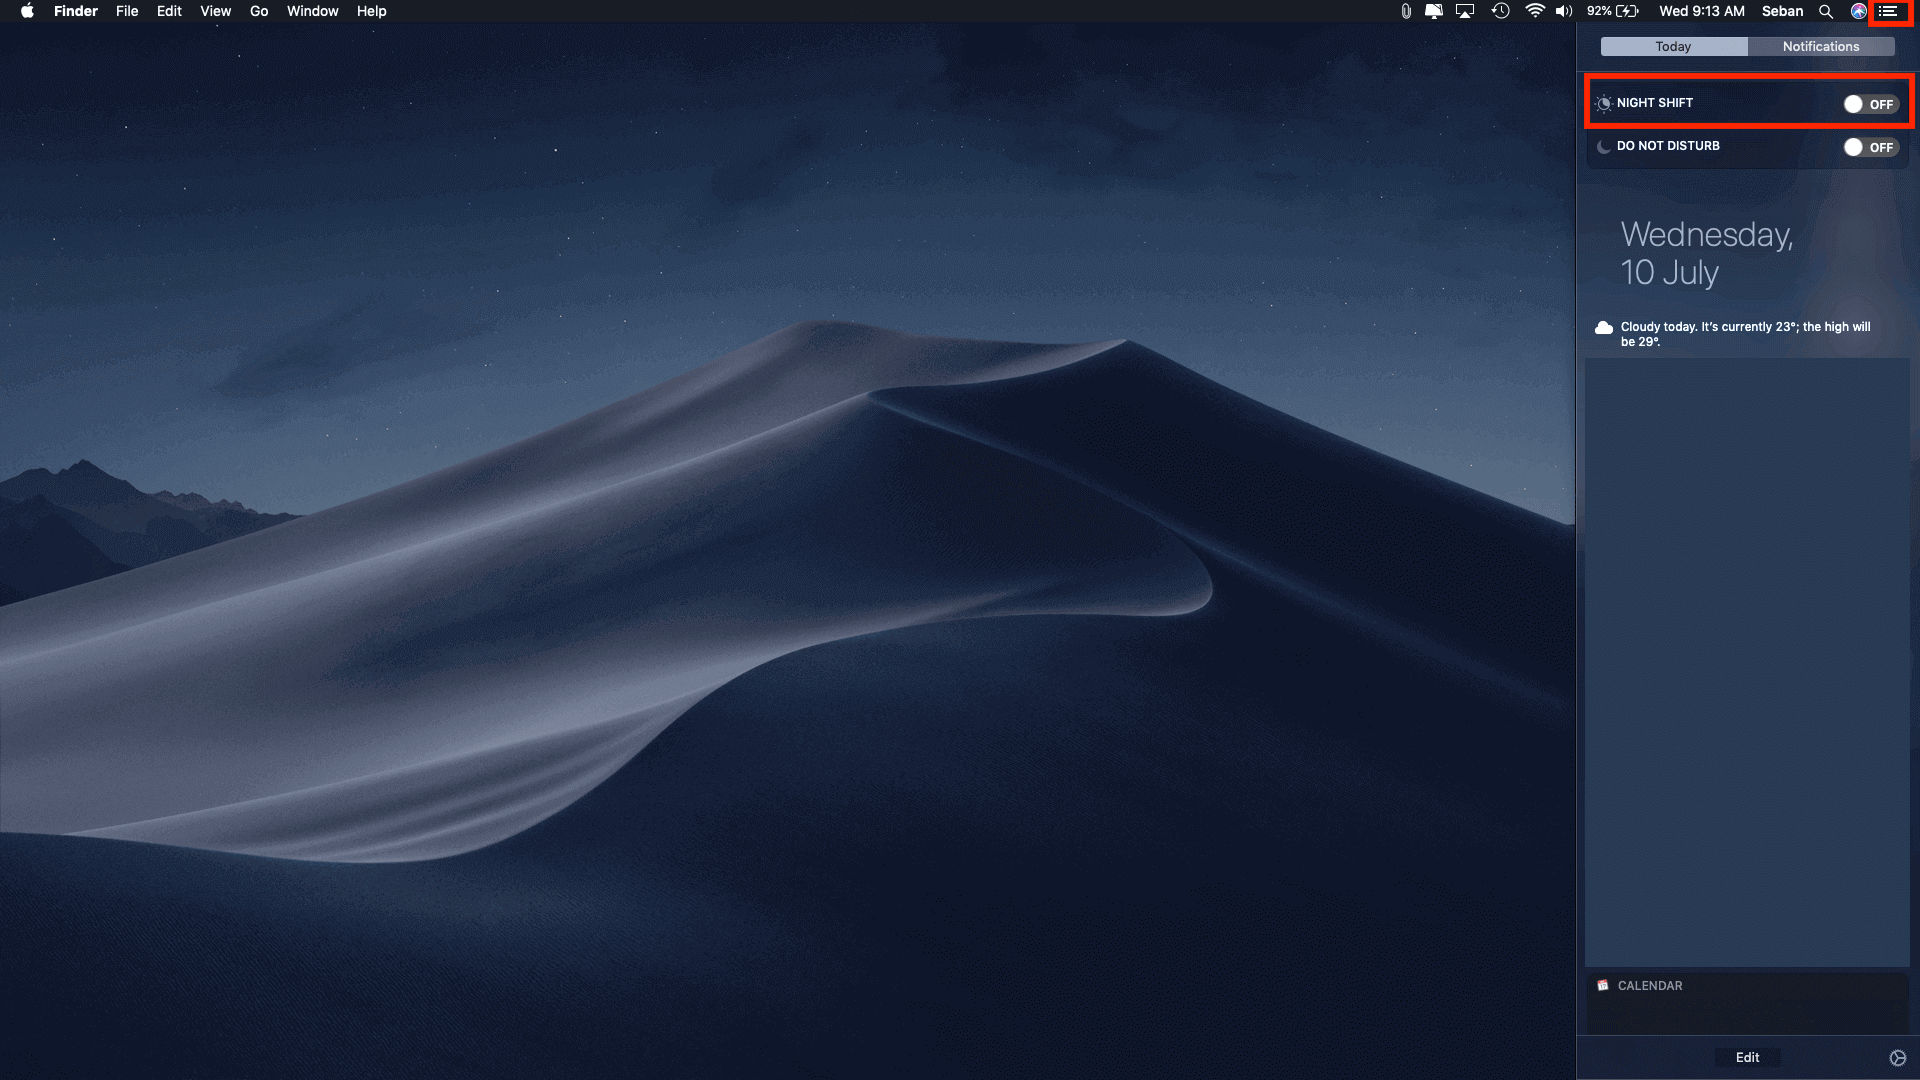
Quickest way to turn on Night Shift mode
You can manually turn on the Night Shift mode from the Notification Center as well. Click the Notification Center icon (highlighted in red box) in the menu bar, or swipe left with two fingers from the right side of your trackpad. Then scroll up to reveal the Night Shift setting and the toggle the switch button.
How to set up Night Shift
I have created a YouTube video which shows you how to setup and enable Night Shift mode, or you could scroll down to read through the steps.
Steps
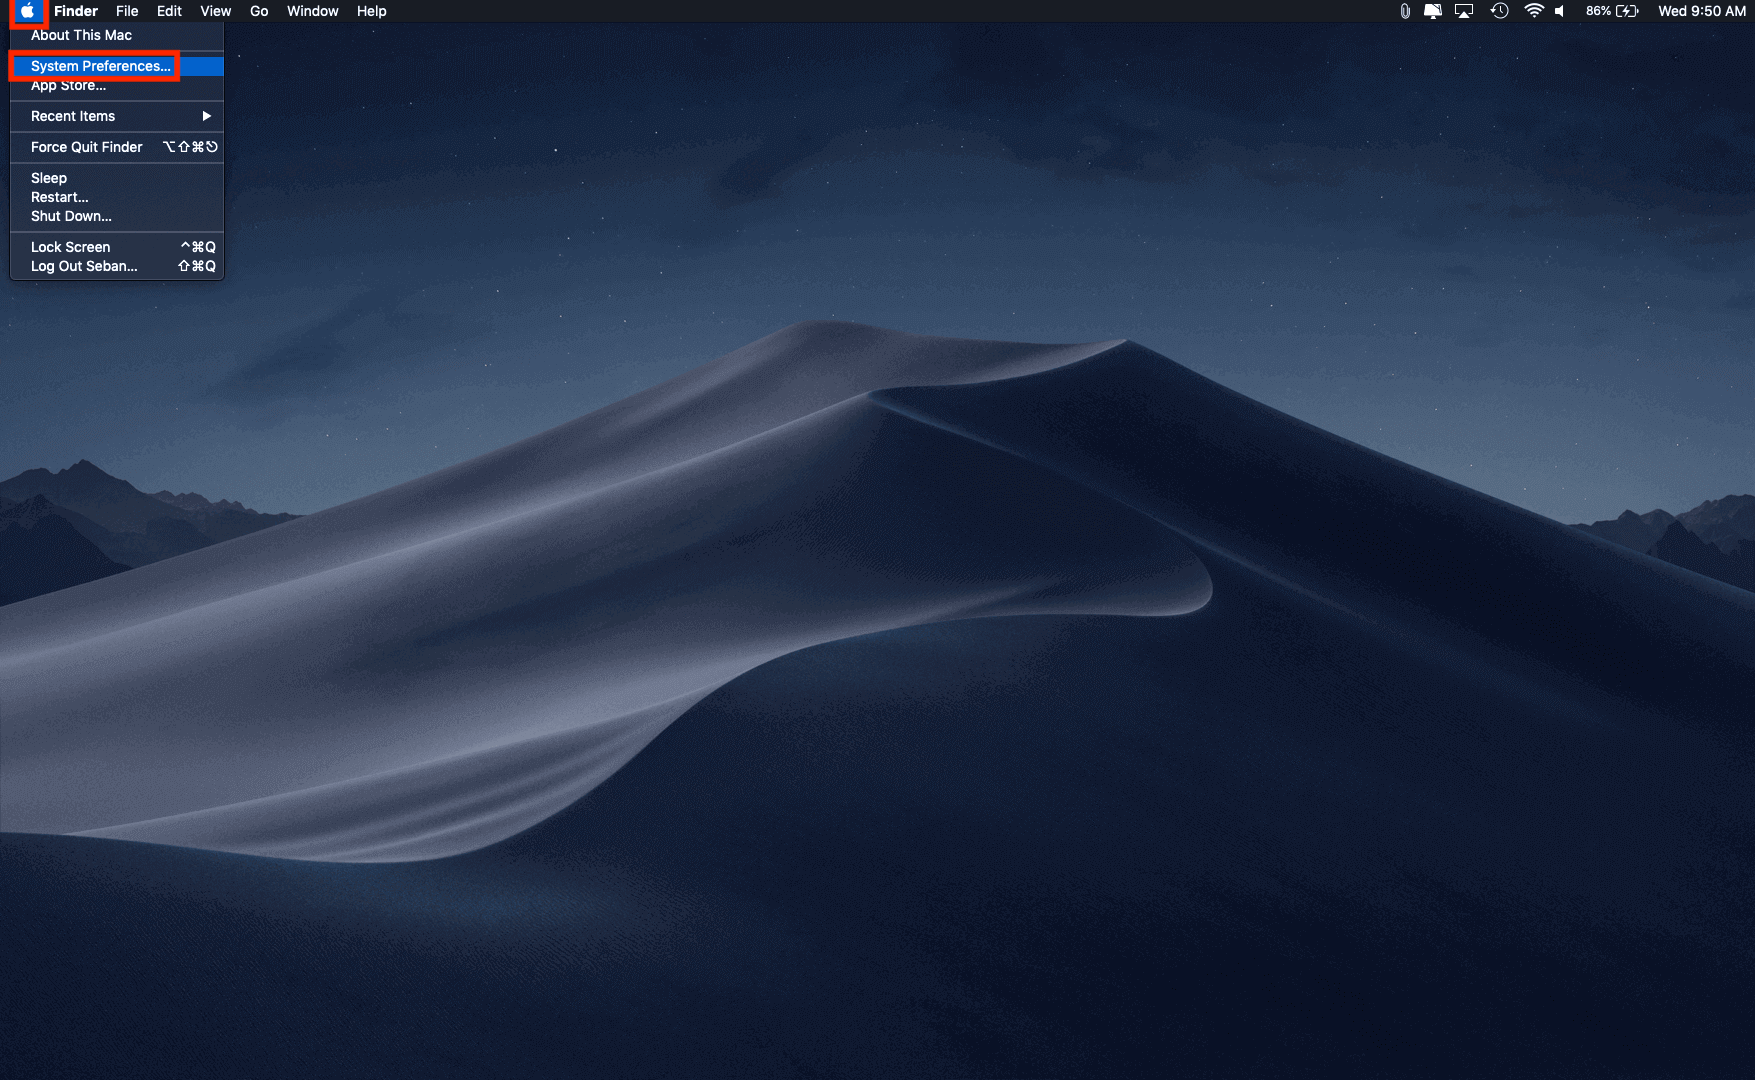
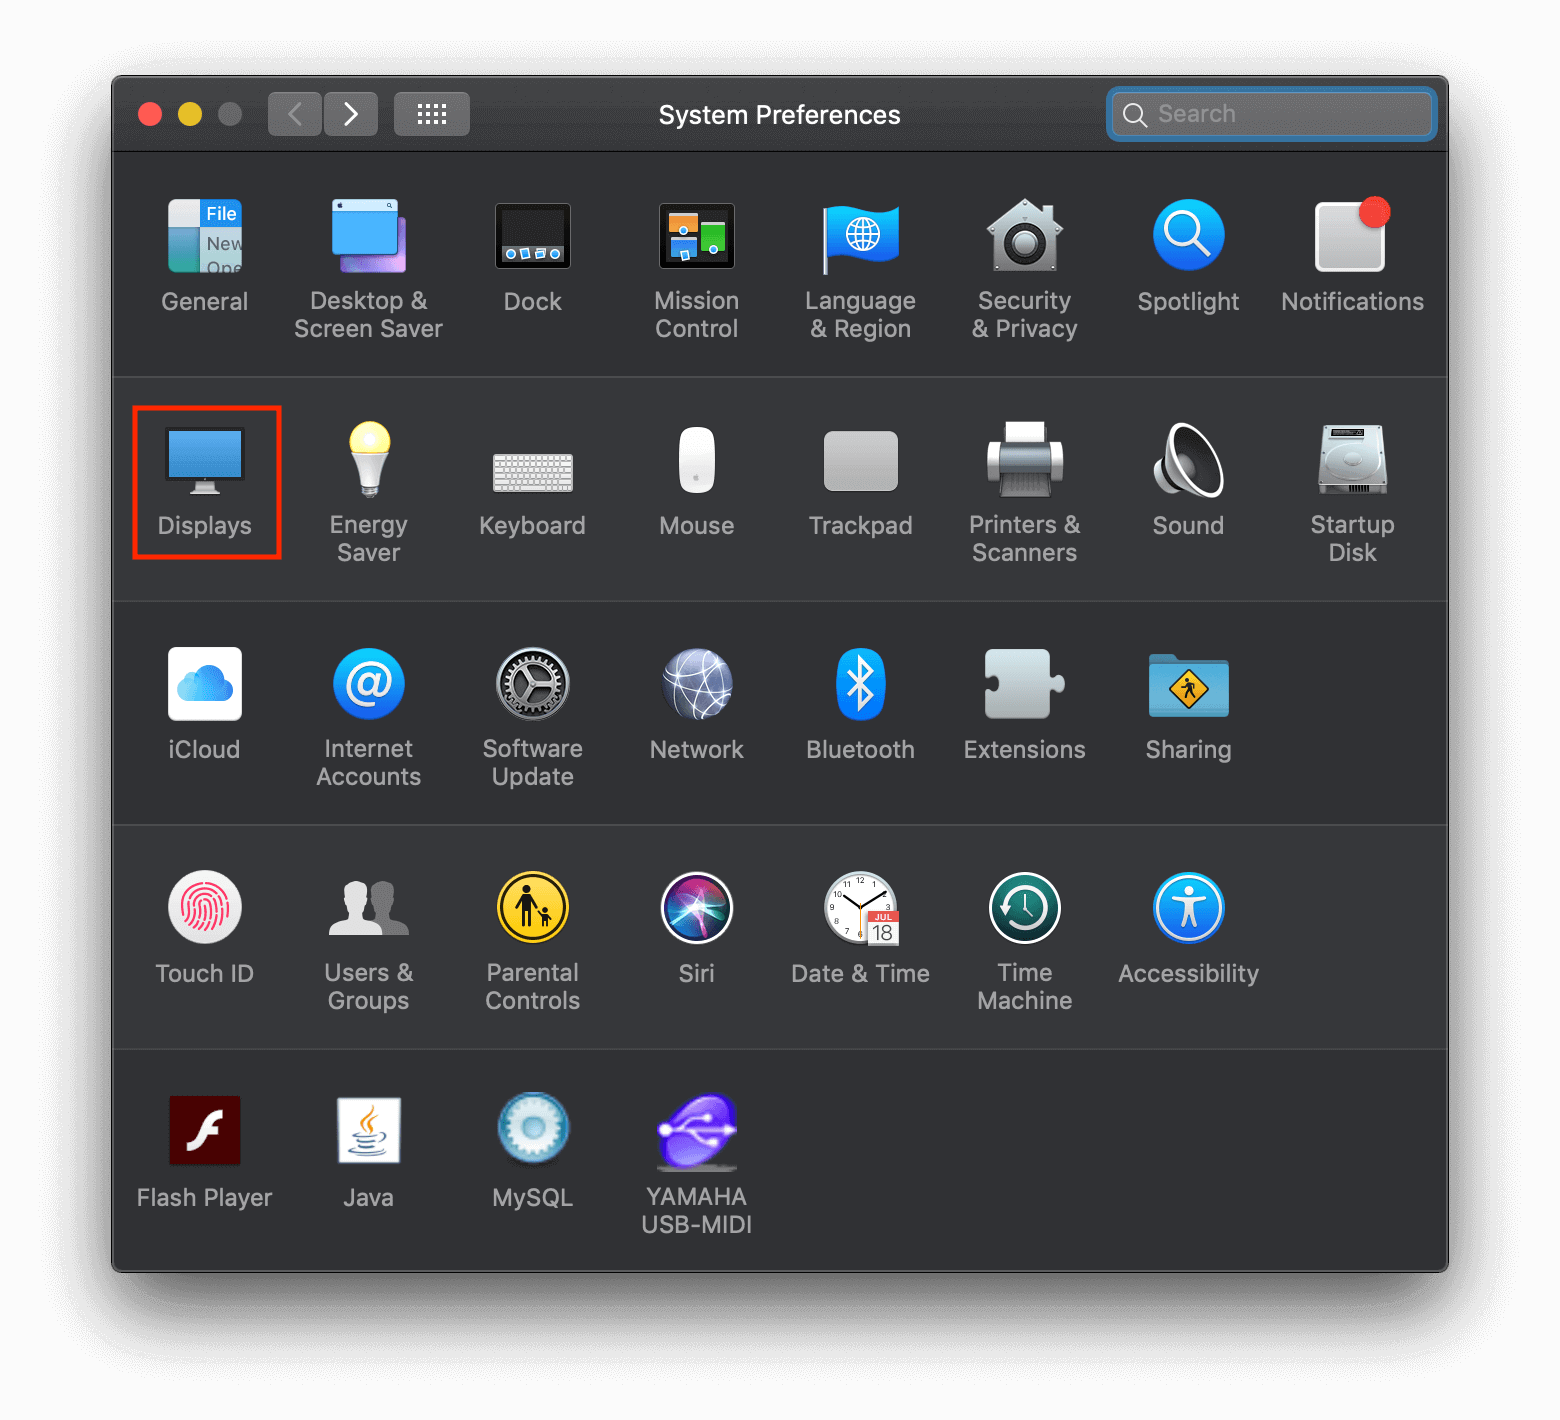
Click on the Apple menu icon () which is located to the top left corner of your home screen. Click on the option for System Preferences. OR If you have the System Preferences icon in your Dock you can choose that to run the app.
Click on the Displays option.
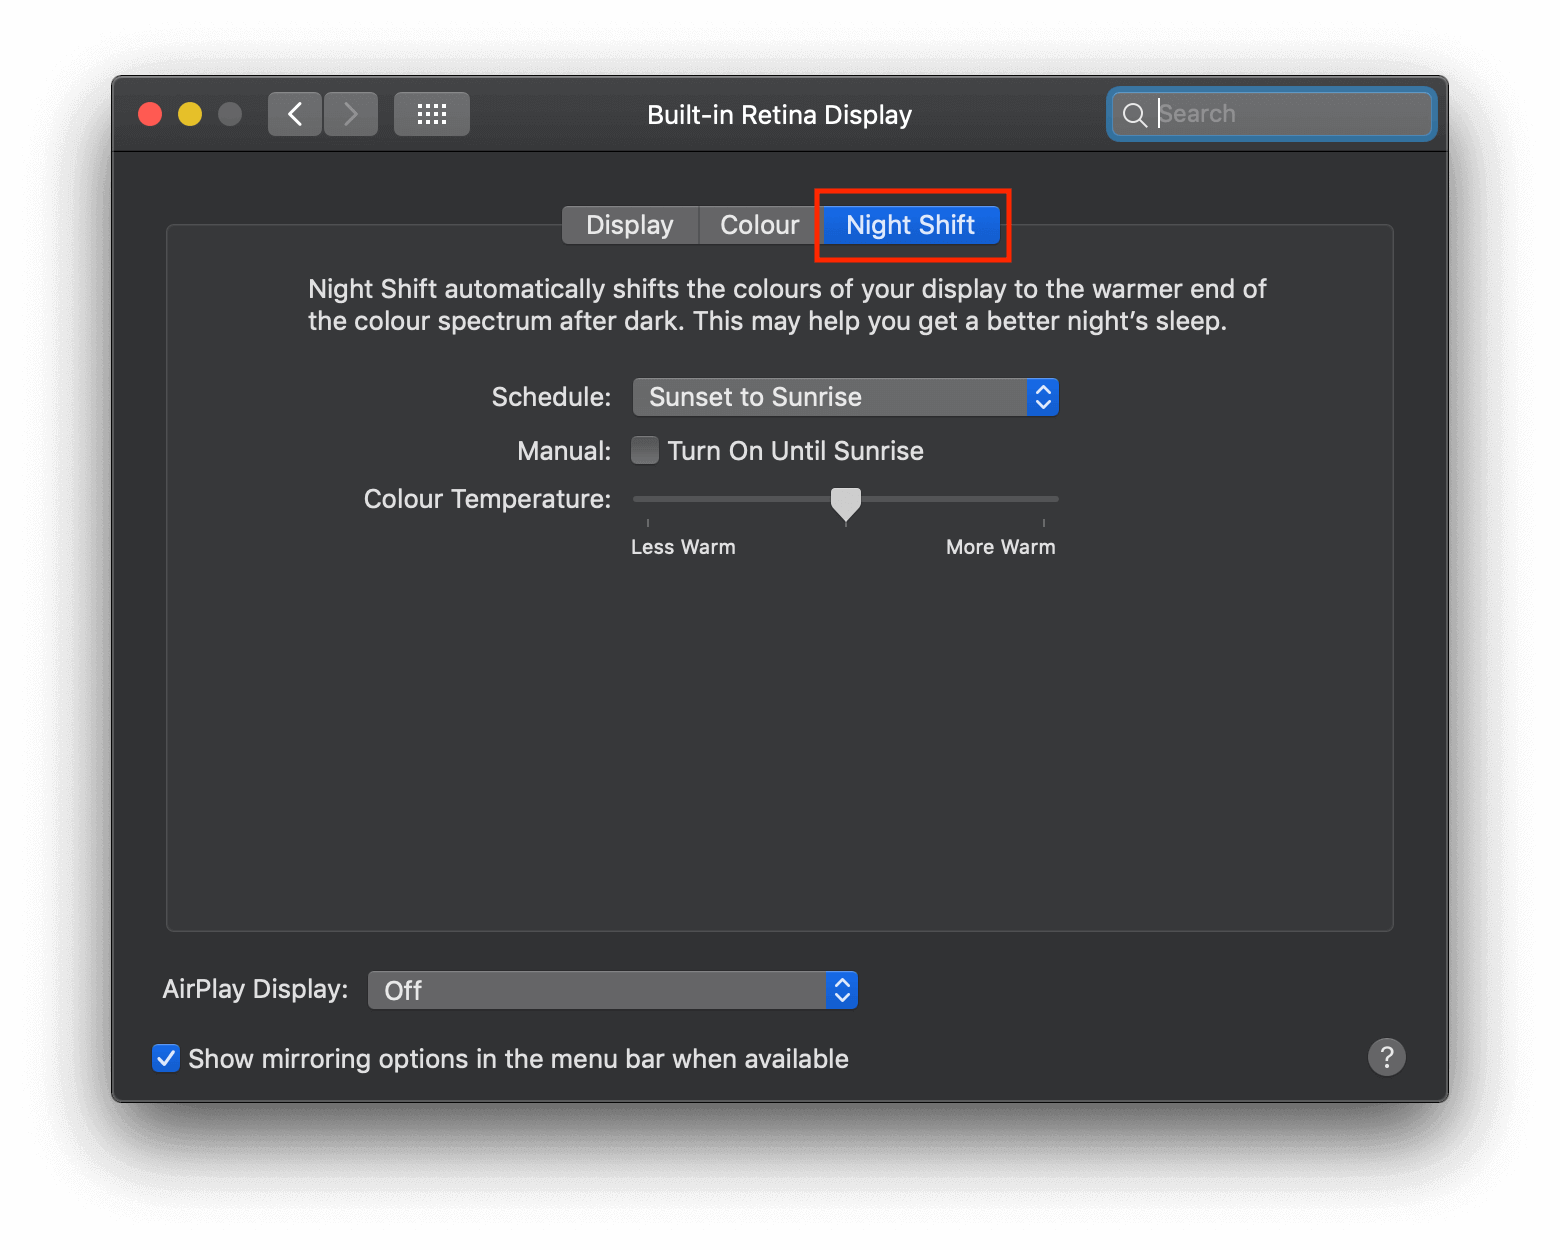
Click on the Night Shift tab.
Customisations
Schedule: Create a custom schedule or have it turn on automatically from sunset to sunrise.
Manual:
If Night Shift is off, select the checkbox to turn it on until 7 a.m. If you’re using a schedule, it automatically turns off at the scheduled time.
If Night Shift is on, deselect the checkbox to turn it off. If you’re using a schedule, it turns on again at the scheduled time.
Color Temperature: Drag the slider to make the color temperature more or less warm when Night Shift is on. Warmer color temperatures show more yellow and less blue.
By connecting to GitHub through SSH, you won’t be prompted to enter your credentials every time you pull or push to a repository; which is something you would end up doing way too often.
Step 1: Checking for existing SSH keys
It is always safe to initially check for existing SSH keys before creating a new one.
Open the Terminal application
Enter the following command to see if there are existing SSH keys
$ ls -al ~/.ssh
By default, you might end up seeing the filenames of the public SSH keys like the ones mentioned below:
id_dsa.pub
id_ecdsa.pub
id_ed25519.pub
id_rsa.pub
Step 2: Generate a new SSH key
If you don’t have an existing public and private key pair, or don’t wish to use any that are available to connect to GitHub follow through the steps mentioned below.
In the Terminal application, paste the code below and substitute your GitHub email address
This creates a new SSH key for the email address that was provided. If everything went well you would see the log message as shown below.
> Generating public/private rsa key pair.
When you are prompted to “Enter a file in which to save the key,” press Enter. This accepts the default file location (as mentioned below).
> Enter a file in which to save the key
(/Users/you/.ssh/id_rsa): [Press enter]
When you are prompted to type a secure passphrase. Enter one to secure your SSH key.
> Enter passphrase (empty for no passphrase): [Type a  passphrase]

> Enter same passphrase again: [Type passphrase again]
Step 3 – Adding your SSH key to the ssh-agent
While adding the SSH key to the agent, use the macOS’ default ssh-add command, and not an application installed by macports, homebrew, or some other external source.
Start the ssh-agent in the background by running the first line shown below.
$ eval "$(ssh-agent -s)"
> Agent pid 59566
If you are using macOS Sierra 10.12.2 or later, you will need to modify your ~/.ssh/configfile to load keys automatically into the ssh-agent and store pass-phrases for your SSH key in your keychain.
Add your SSH private key to the ssh-agent and store your passphrase in the keychain. If you created your key with a different name, or if you are adding an existing key that has a different name, replace id_rsa in the command with the name of your private key file.
$ ssh-add -K ~/.ssh/id_rsa
If you don’t have Apple’s standard version installed, you may receive an error. For more information on resolving this error, see “Error: ssh-add: illegal option — K.”
Note: The -K option is Apple’s standard version of ssh-add, which stores the passphrase in your keychain for you when you add an ssh key to the ssh-agent.
Step 4 – Adding the SSH key to your GitHub account
Copy the SSH key to your clipboard by running the code mentioned below. If your SSH key file has a different name than the example code, modify the filename to match your current setup. When copying your key, don’t add any newlines or whitespace.
$ pbcopy < ~/.ssh/id_rsa.pub
# Copies the contents of the id_rsa.pub file to your clipboard
Tip: If pbcopy isn’t working, you can locate the hidden .ssh folder, open the file in your favorite text editor, and copy it to your clipboard.
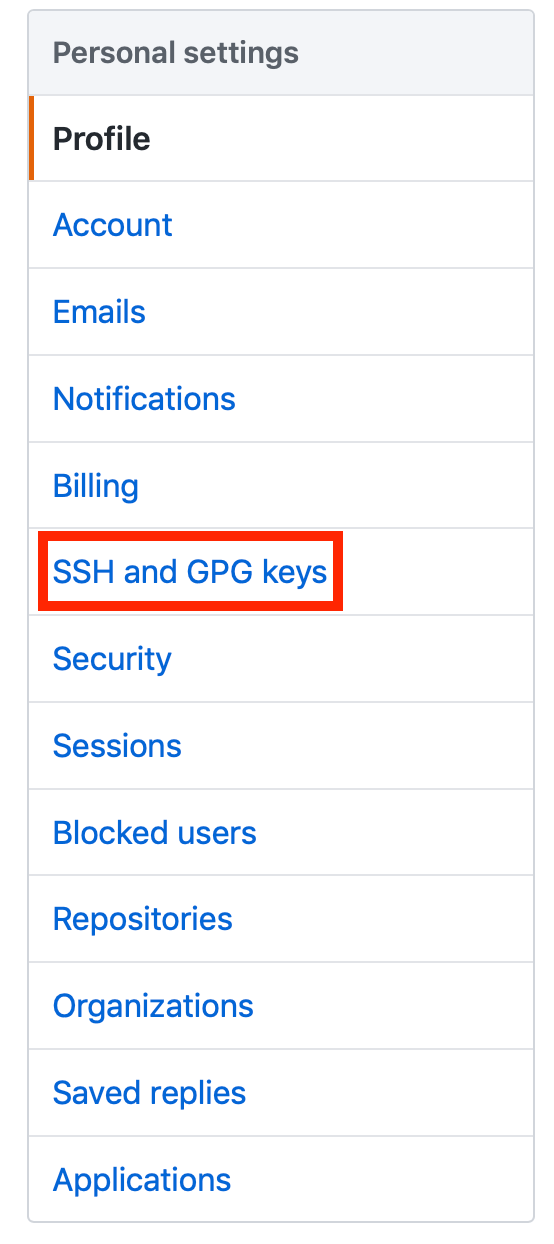
Now head on to the Github website, in the upper-right corner of the home page, click on your profile photo, then click Settings.
In the user settings sidebar, click SSH and GPG keys (highlighted in red).
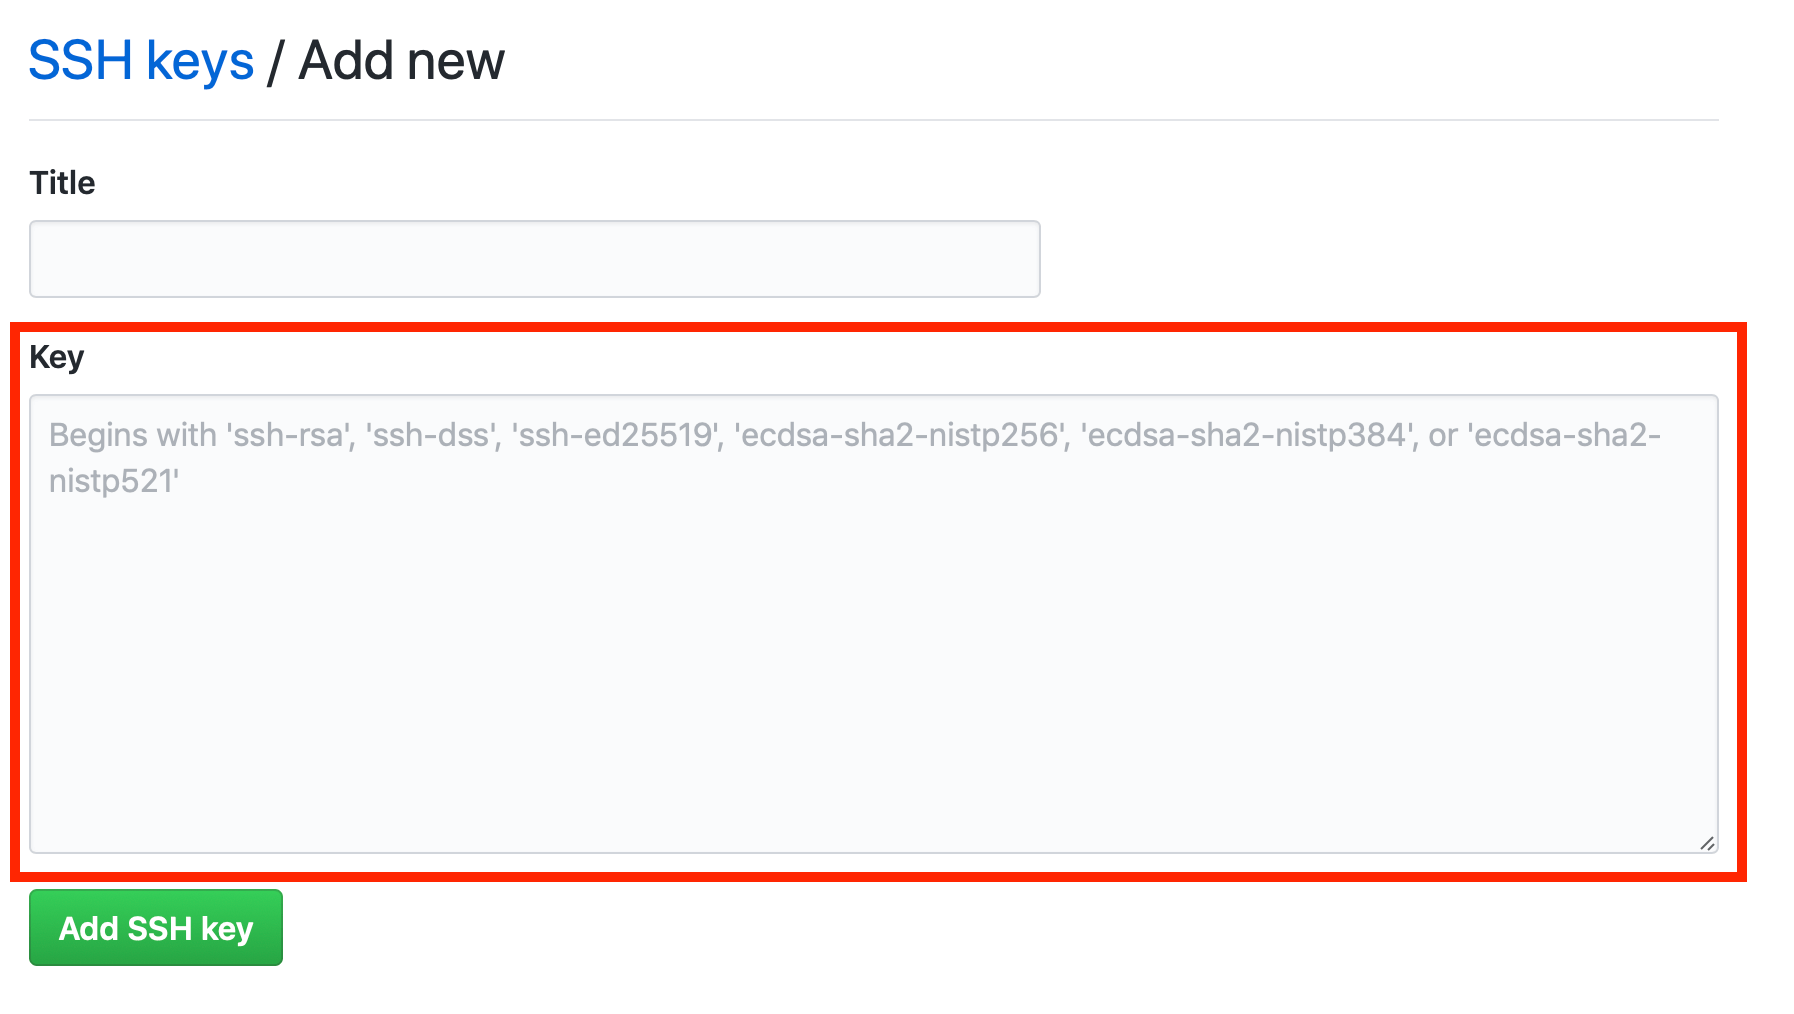
Click the button to the right which usually says New SSH key or Add SSH key (highlighted in red).
In the “Title” field (highlighted in red), add a descriptive label for the new key. For example, if you’re using a personal MacBook, you might call this key “Personal MacBook Pro”.
Paste your key that is copied to your clipboard into the “Key” field (highlighted in red).
Click the button below the key field which says “Add SSH key“. Confirm your GitHub password if you are prompted to.
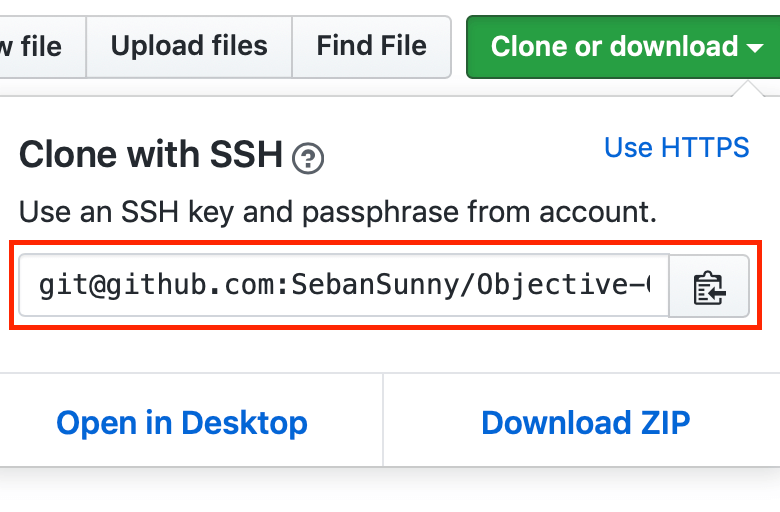
Now that you have created a new SSH key in your machine and having linked the key to Github, you can clone the repositories with the SSH URL. As shown in the image below, make sure the title in the dropdown section says Clone with SSH.
XAMPP is one of the most popular PHP development environment
XAMPP is a completely free and easy to install Apache distribution containing MariaDB, PHP, and Perl. The XAMPP open source package has been set up to be incredibly easy to install and to use.
Here’s a breakdown of the four components of XAMPP:
Linux: an operating system
Apache: an open source web server
MariaDB: one of the most popular database servers made by the original developers of MySQL which is guaranteed to stay open source
PHP: a server-side scripting language (which WordPress sites run on)
Perl: a highly capable and feature-rich programming language with over 30 years of development
When these components come together, they create a local web server on your computer. Which means you can build entire websites and see what they would look like online without being connected to the Internet.
Basically, XAMPP allows you to run a WordPress site on your computer, which is why XAMPP is awesome for testing out new features on your existing site, making bigger changes, or building an entire site from scratch. (If you’d like to learn more about local development, click here)
Step 1: Download XAMPP
Head over to the downloads page of the XAMPP. Scroll down to section for OS X and click on the blueDownload (64-bit) button.
I would suggest if you could download one of versions highlighted in the image above which says “7.2.X / PHP 7.2.X” or “7.3.X / PHP 7.3.X” and not the XAMPP-VM ones.
Step 2: Install XAMPP on Your Mac
XAMPP should start downloading automatically. It can take a few minutes to download. When it’s finished, click on the downloaded file and a typical installation box will appear. Double click on the XAMPP icon to begin the installation.
Follow through the installation process
Step 3: Launching XAMPP
There are two ways to launch XAMPP:
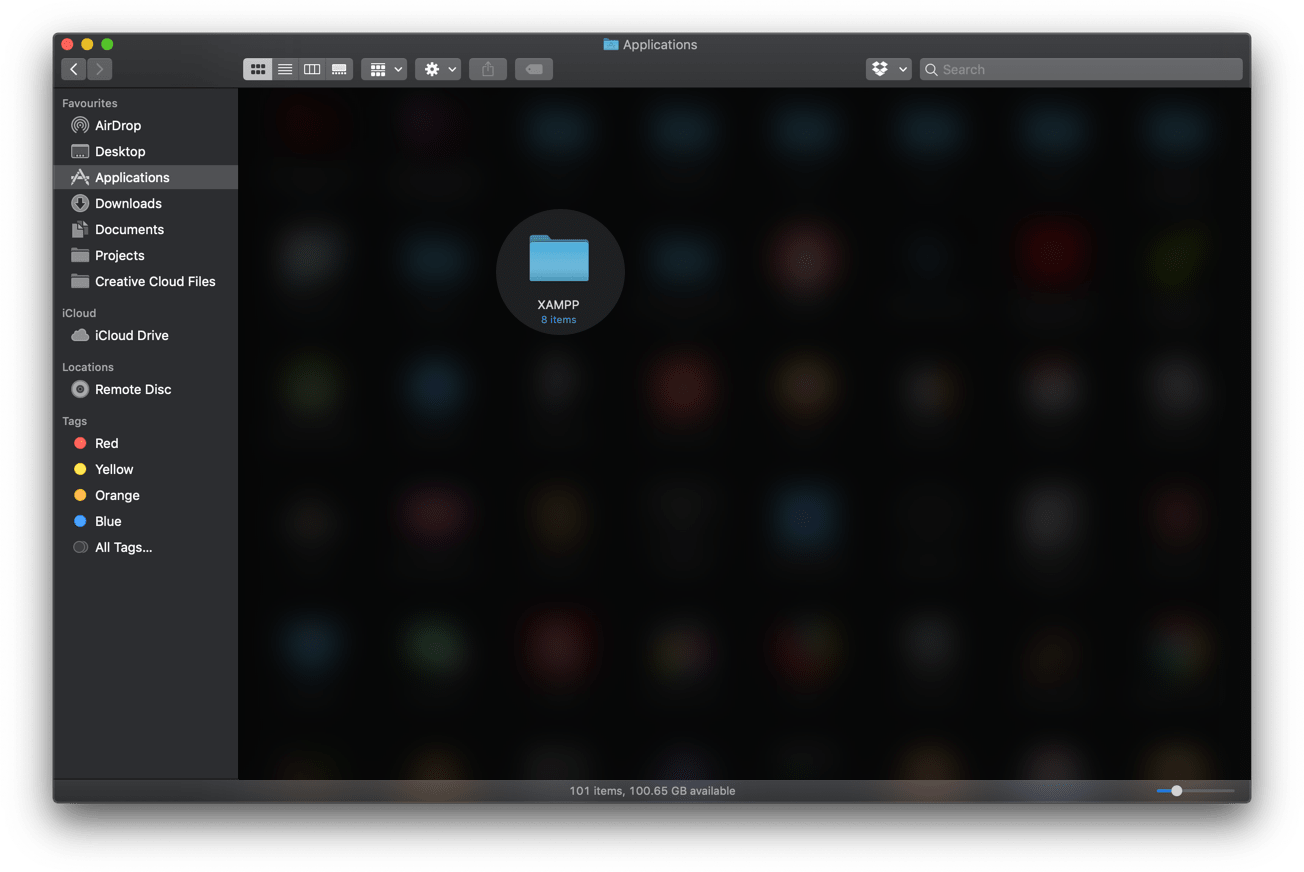
Go into your Applications folder (where XAMPP should have been saved in the previous step) and click the XAMPP folder.
Once inside, you should see folder contents that looks similar to the image below.
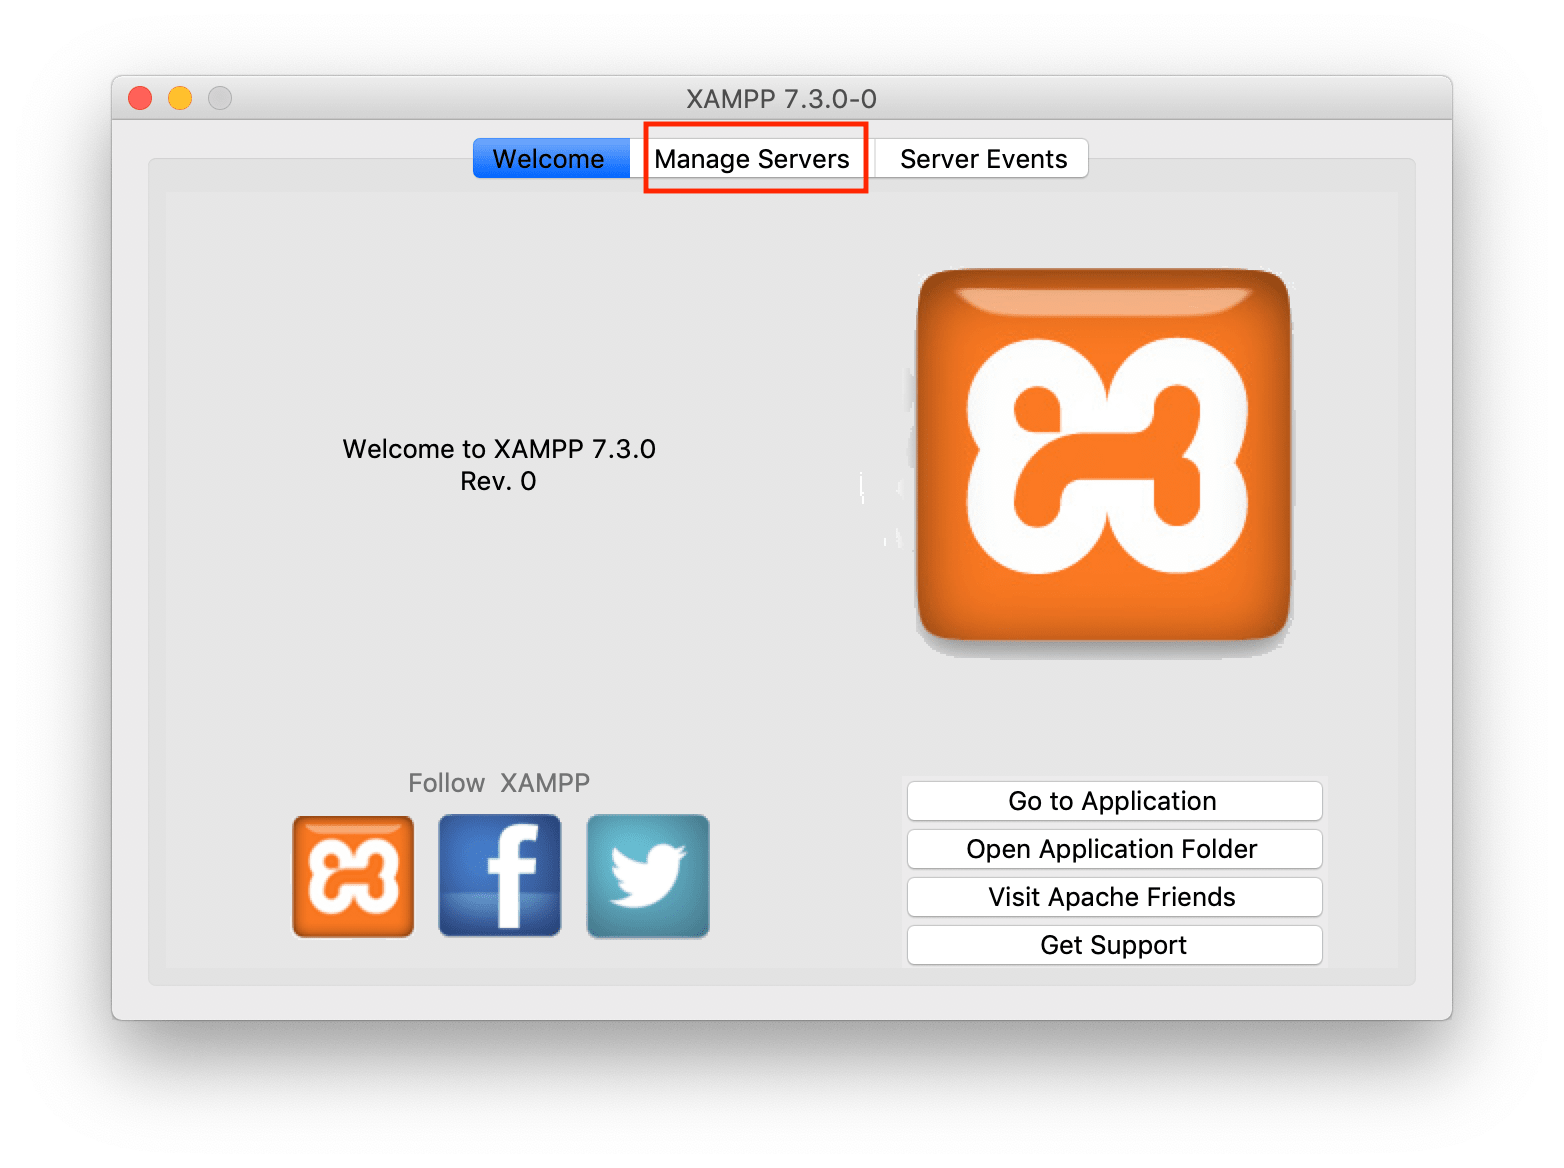
Double click on the white icon which says “manager-osx”, and you’ll see this box appear:
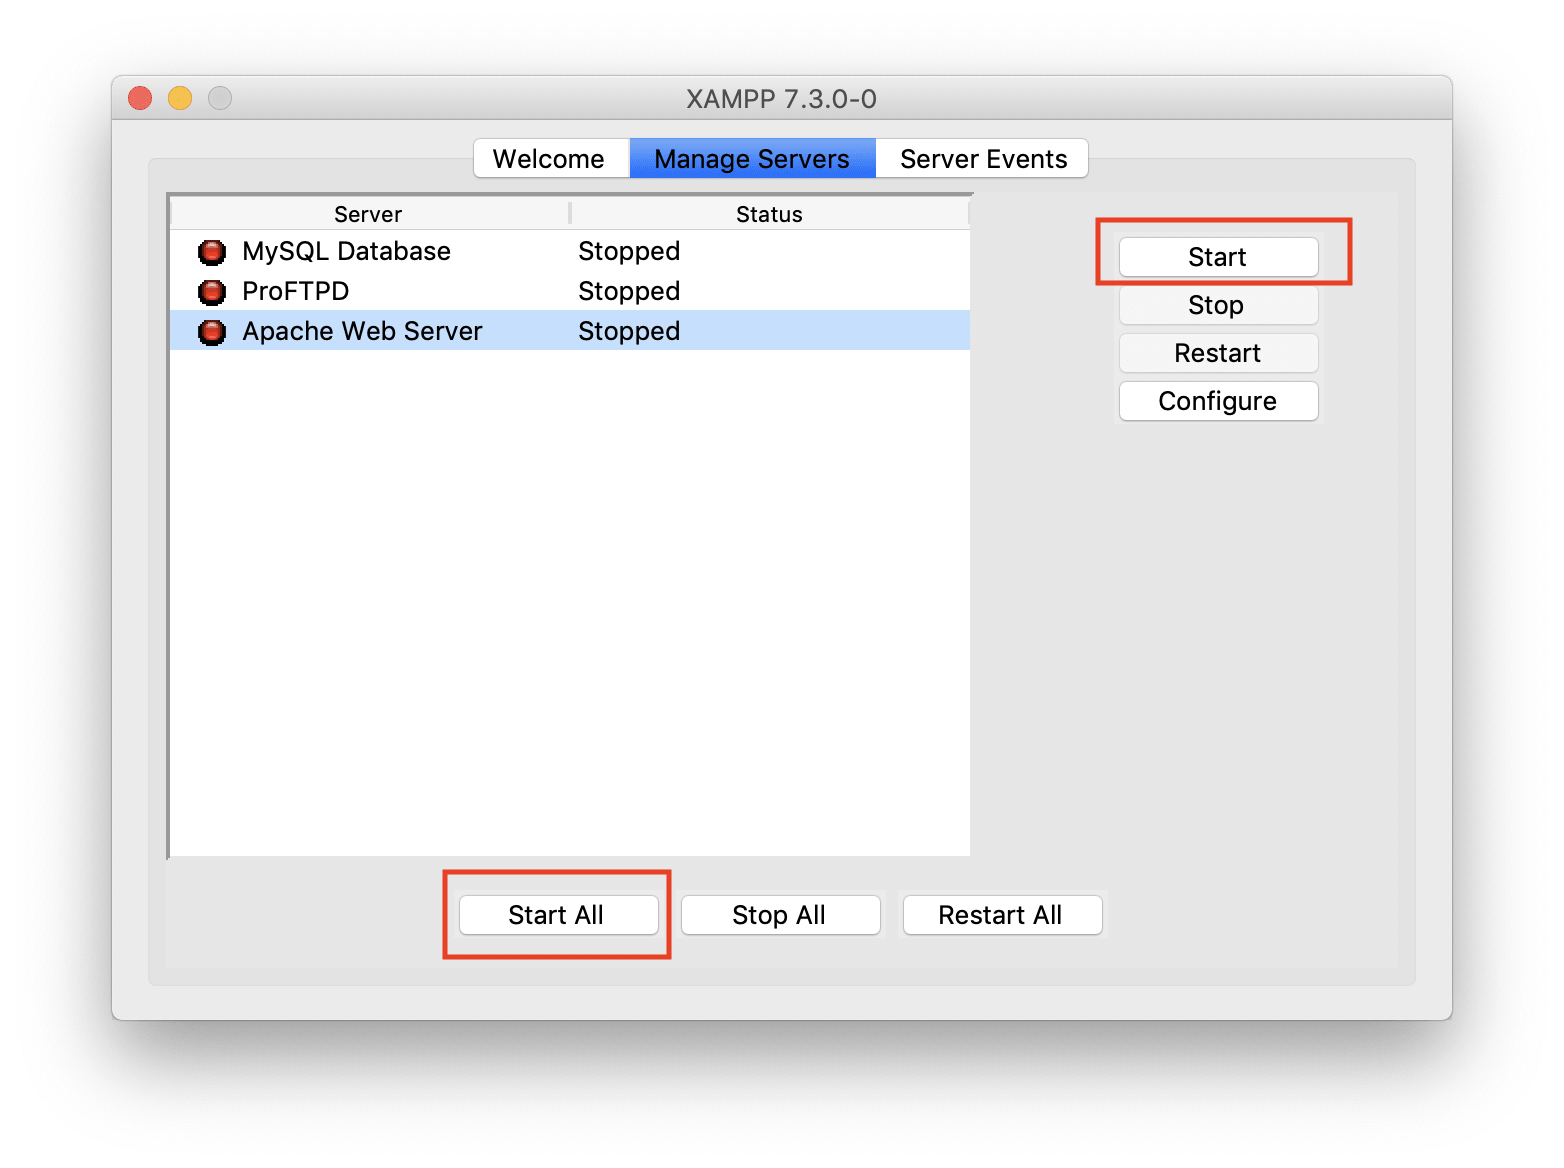
Step 4: Run the Servers
Now, click on the Manage Servers tab option in the XAMPP app.
Now to run the Apache & MySQL servers, either click on the white button in the bottom which says Start All or if you would like to start them up individually click on the white button on the right which says Start.
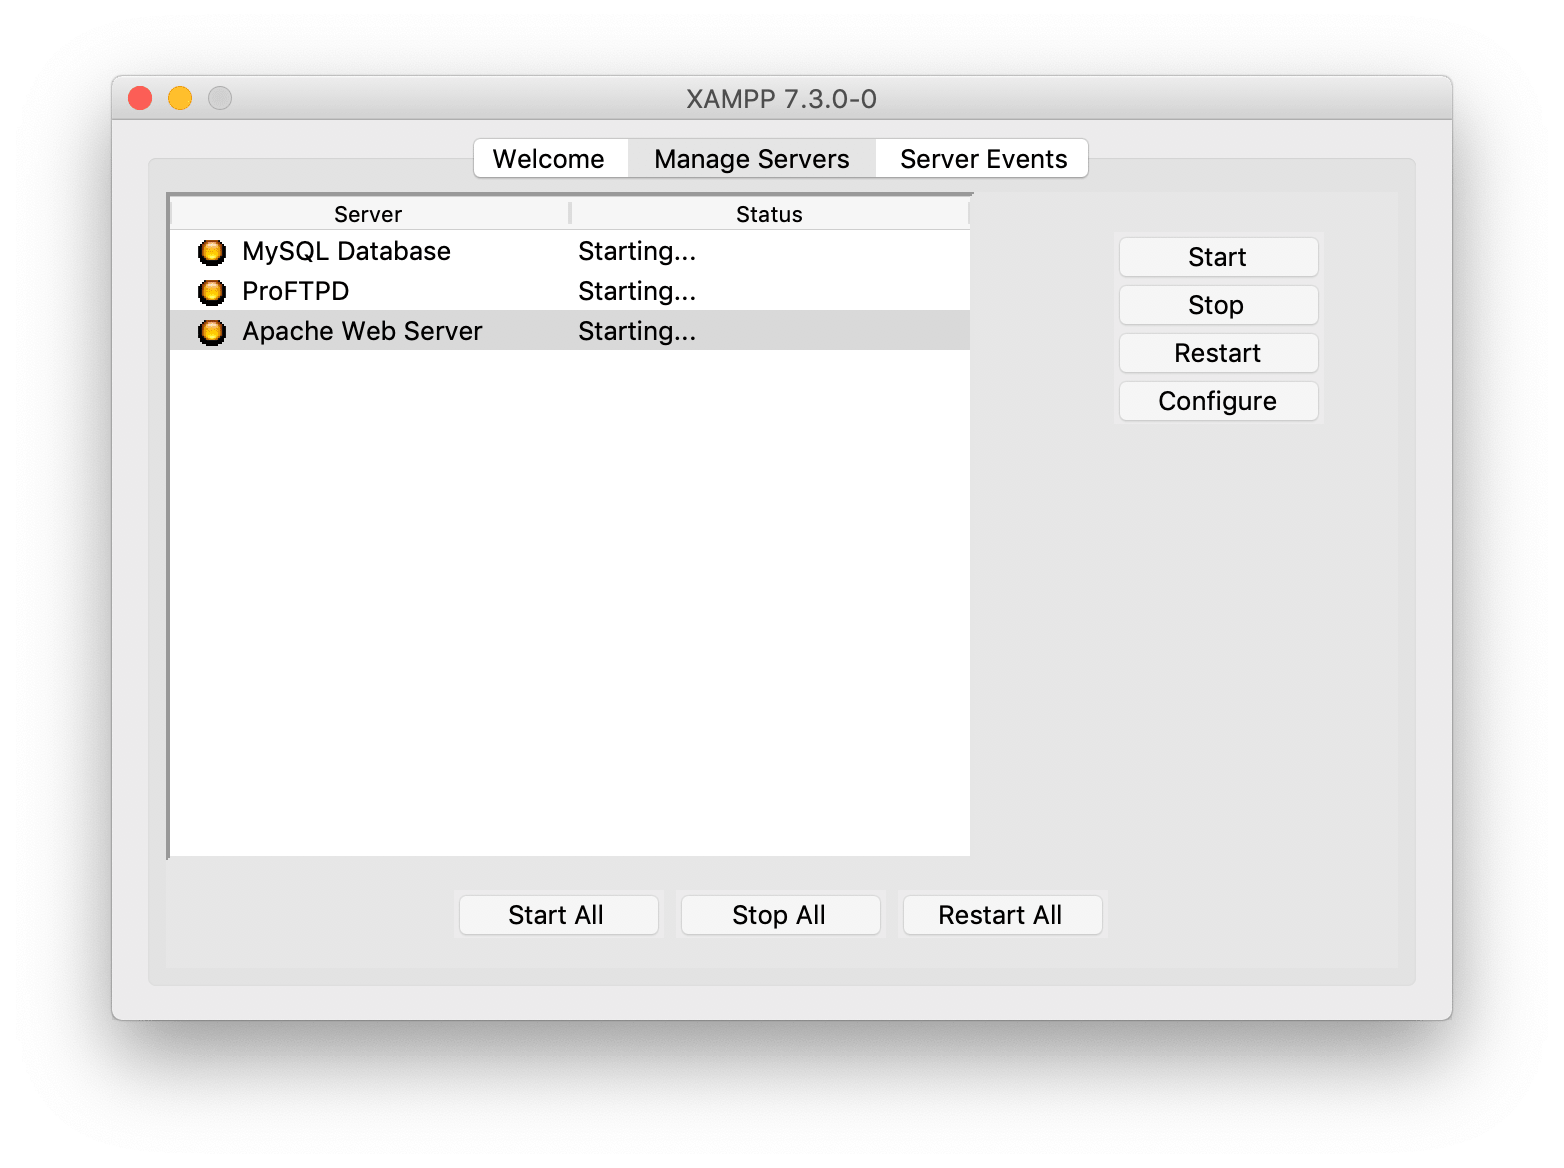
It can take a few seconds for the servers to run. You would see your app as seen in the image below.
Once, the servers are up you would see the status change to Running and the color of the circle to the left to green.
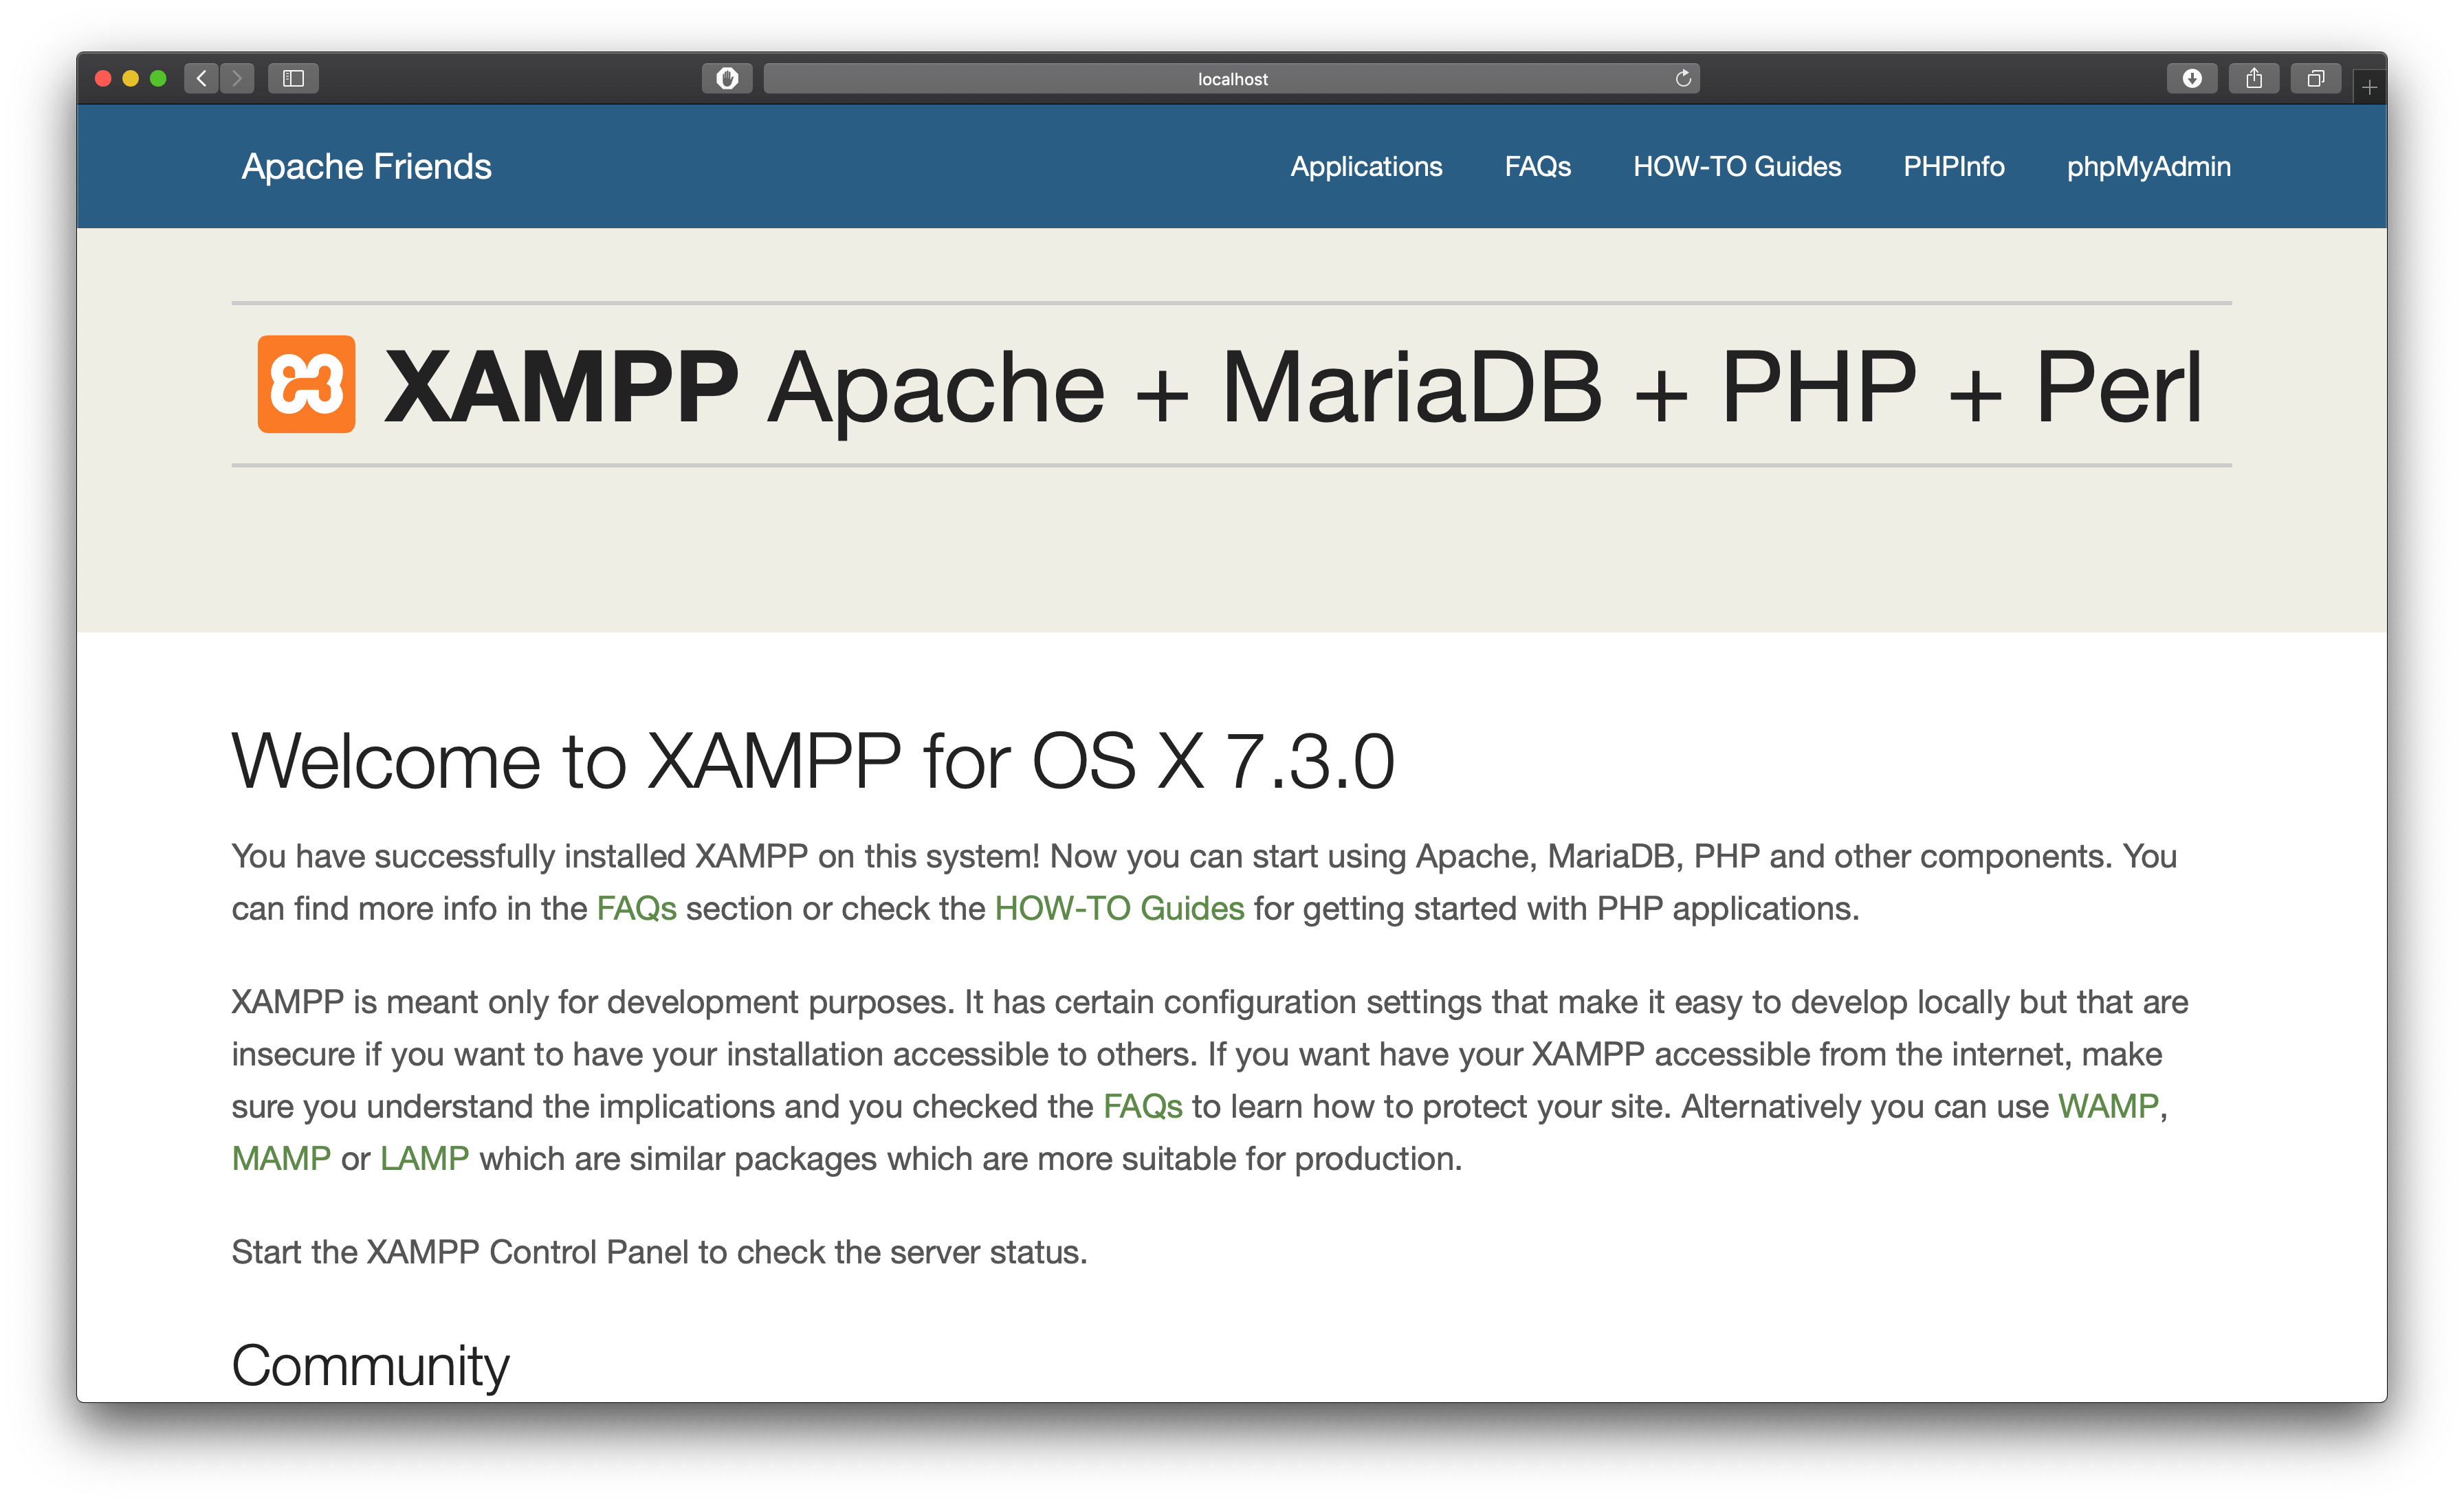
Voila, just type “localhost” in your favourite web browser to see a static page as show in the image below.
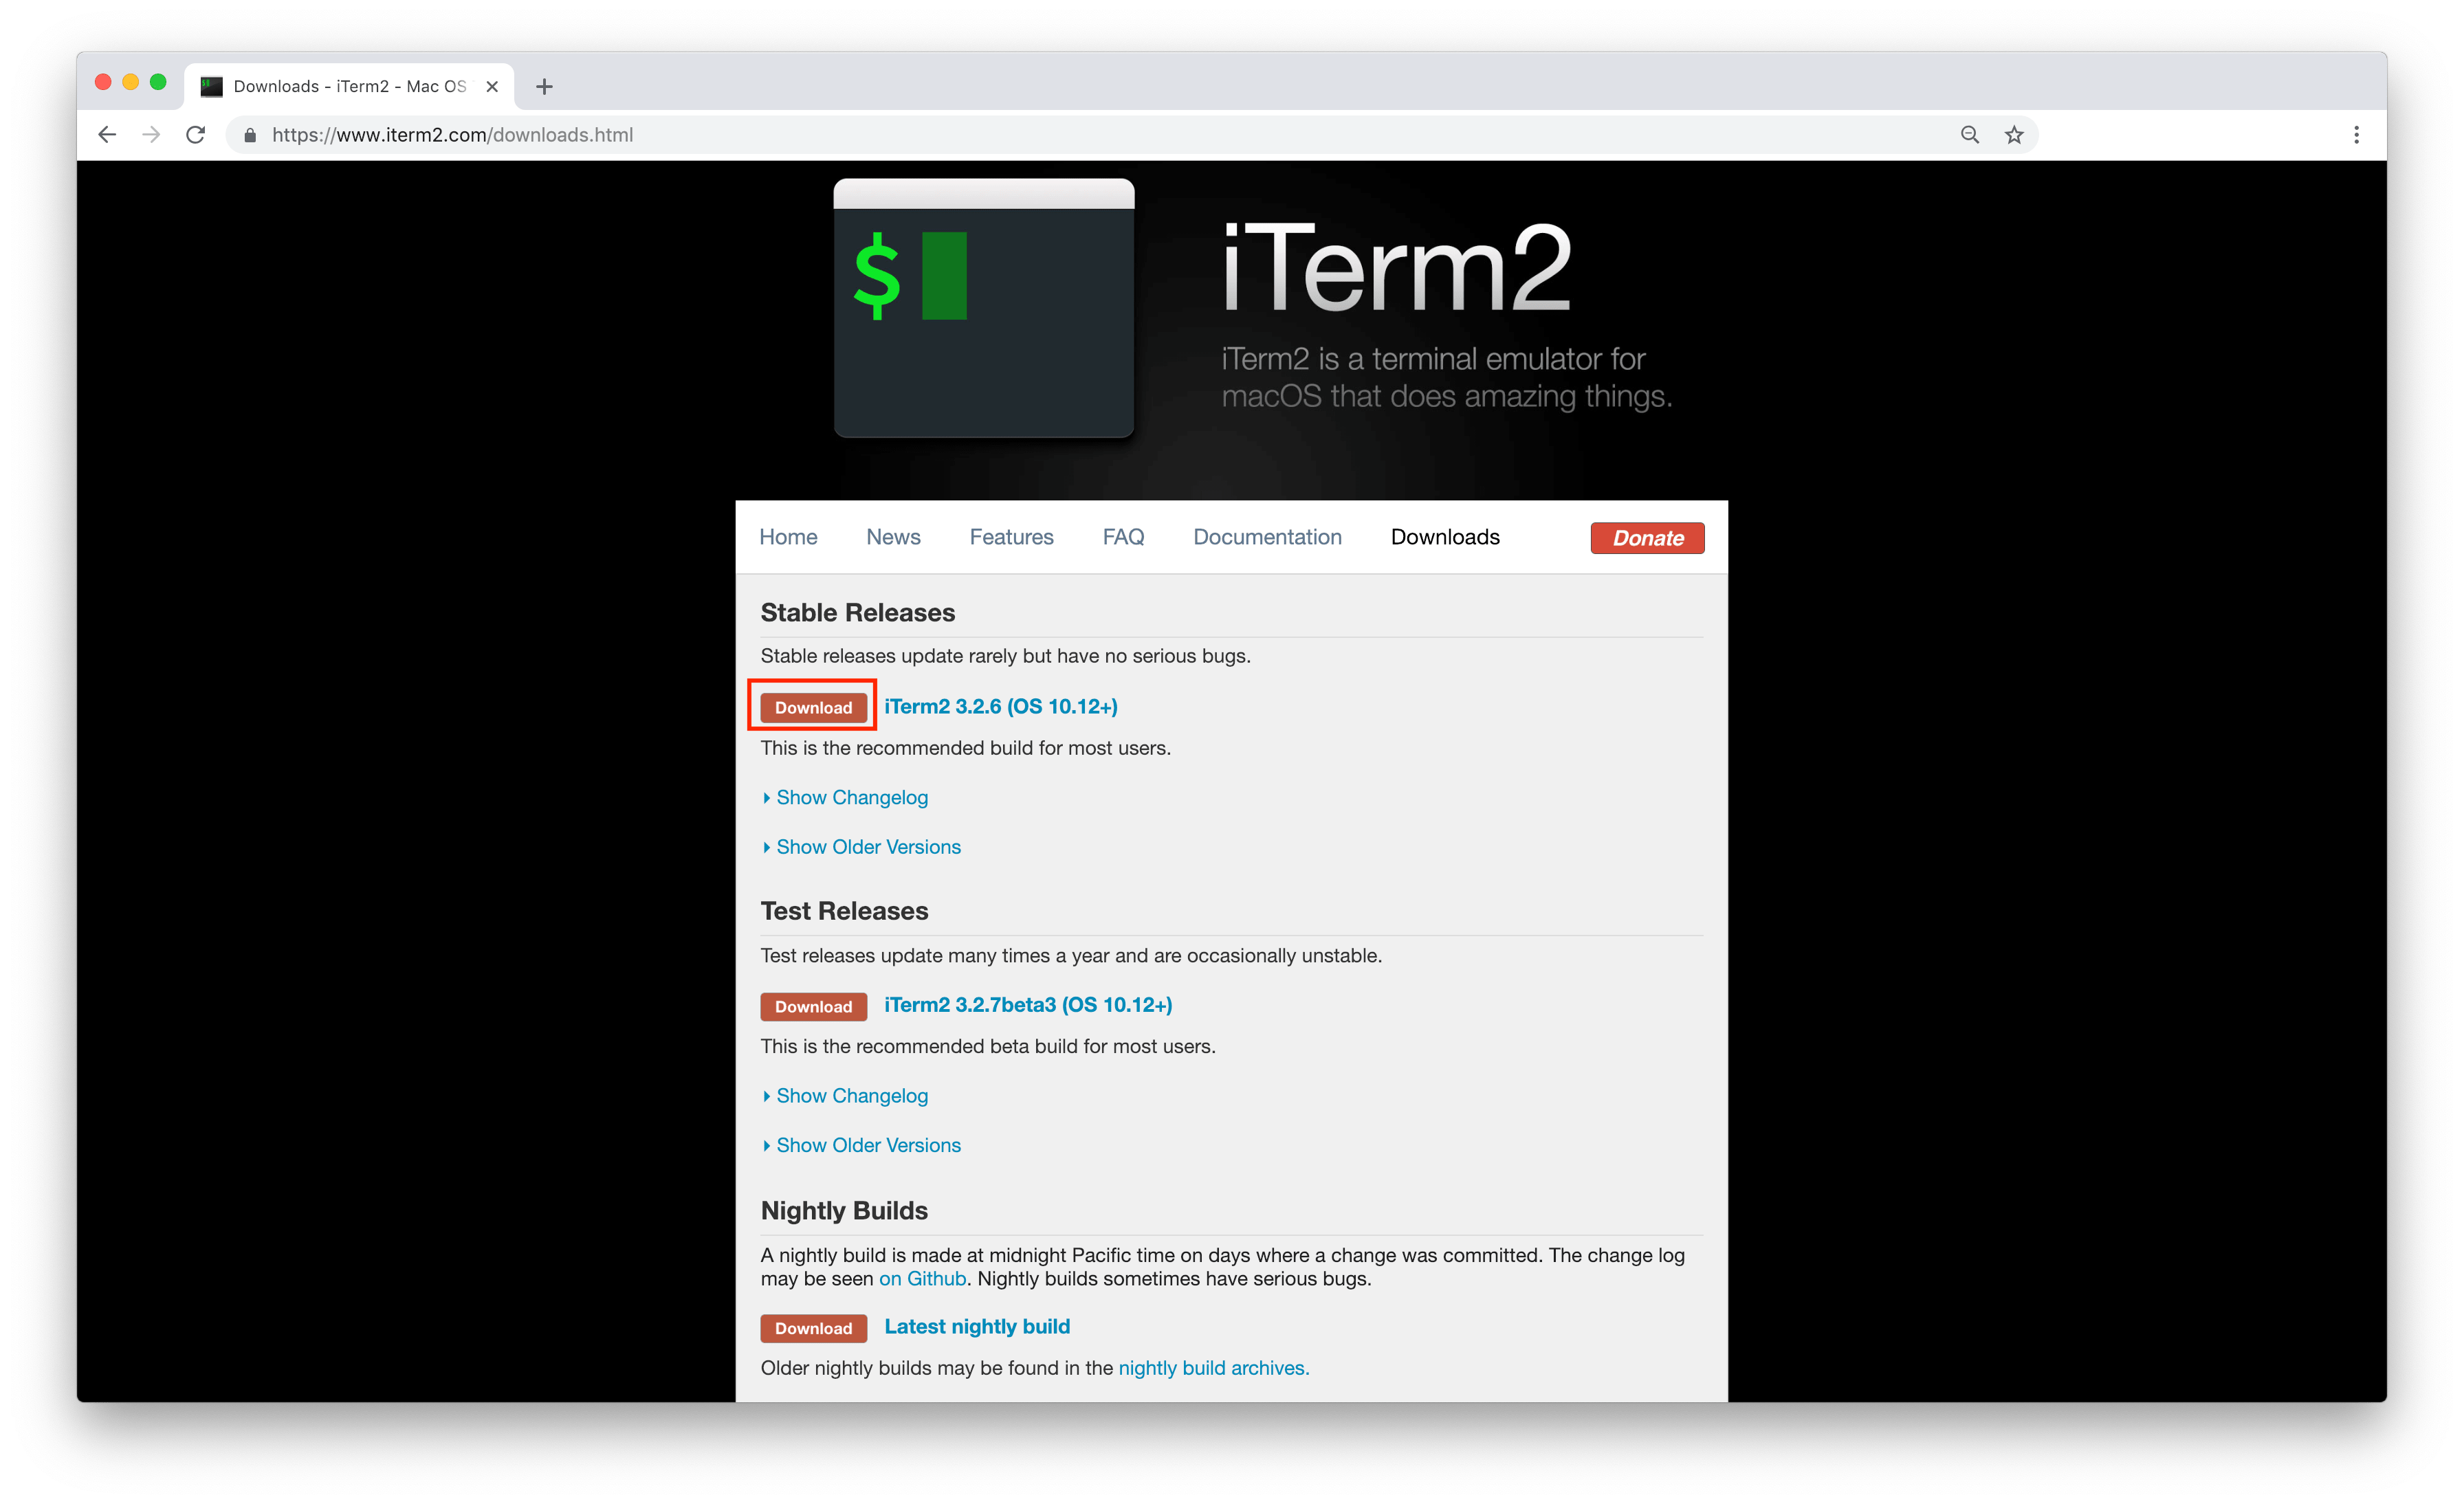
iTerm is the terminal you are missing out on, for your programming life. Choose the version you want to install from this, downloads page.
Steps to install:
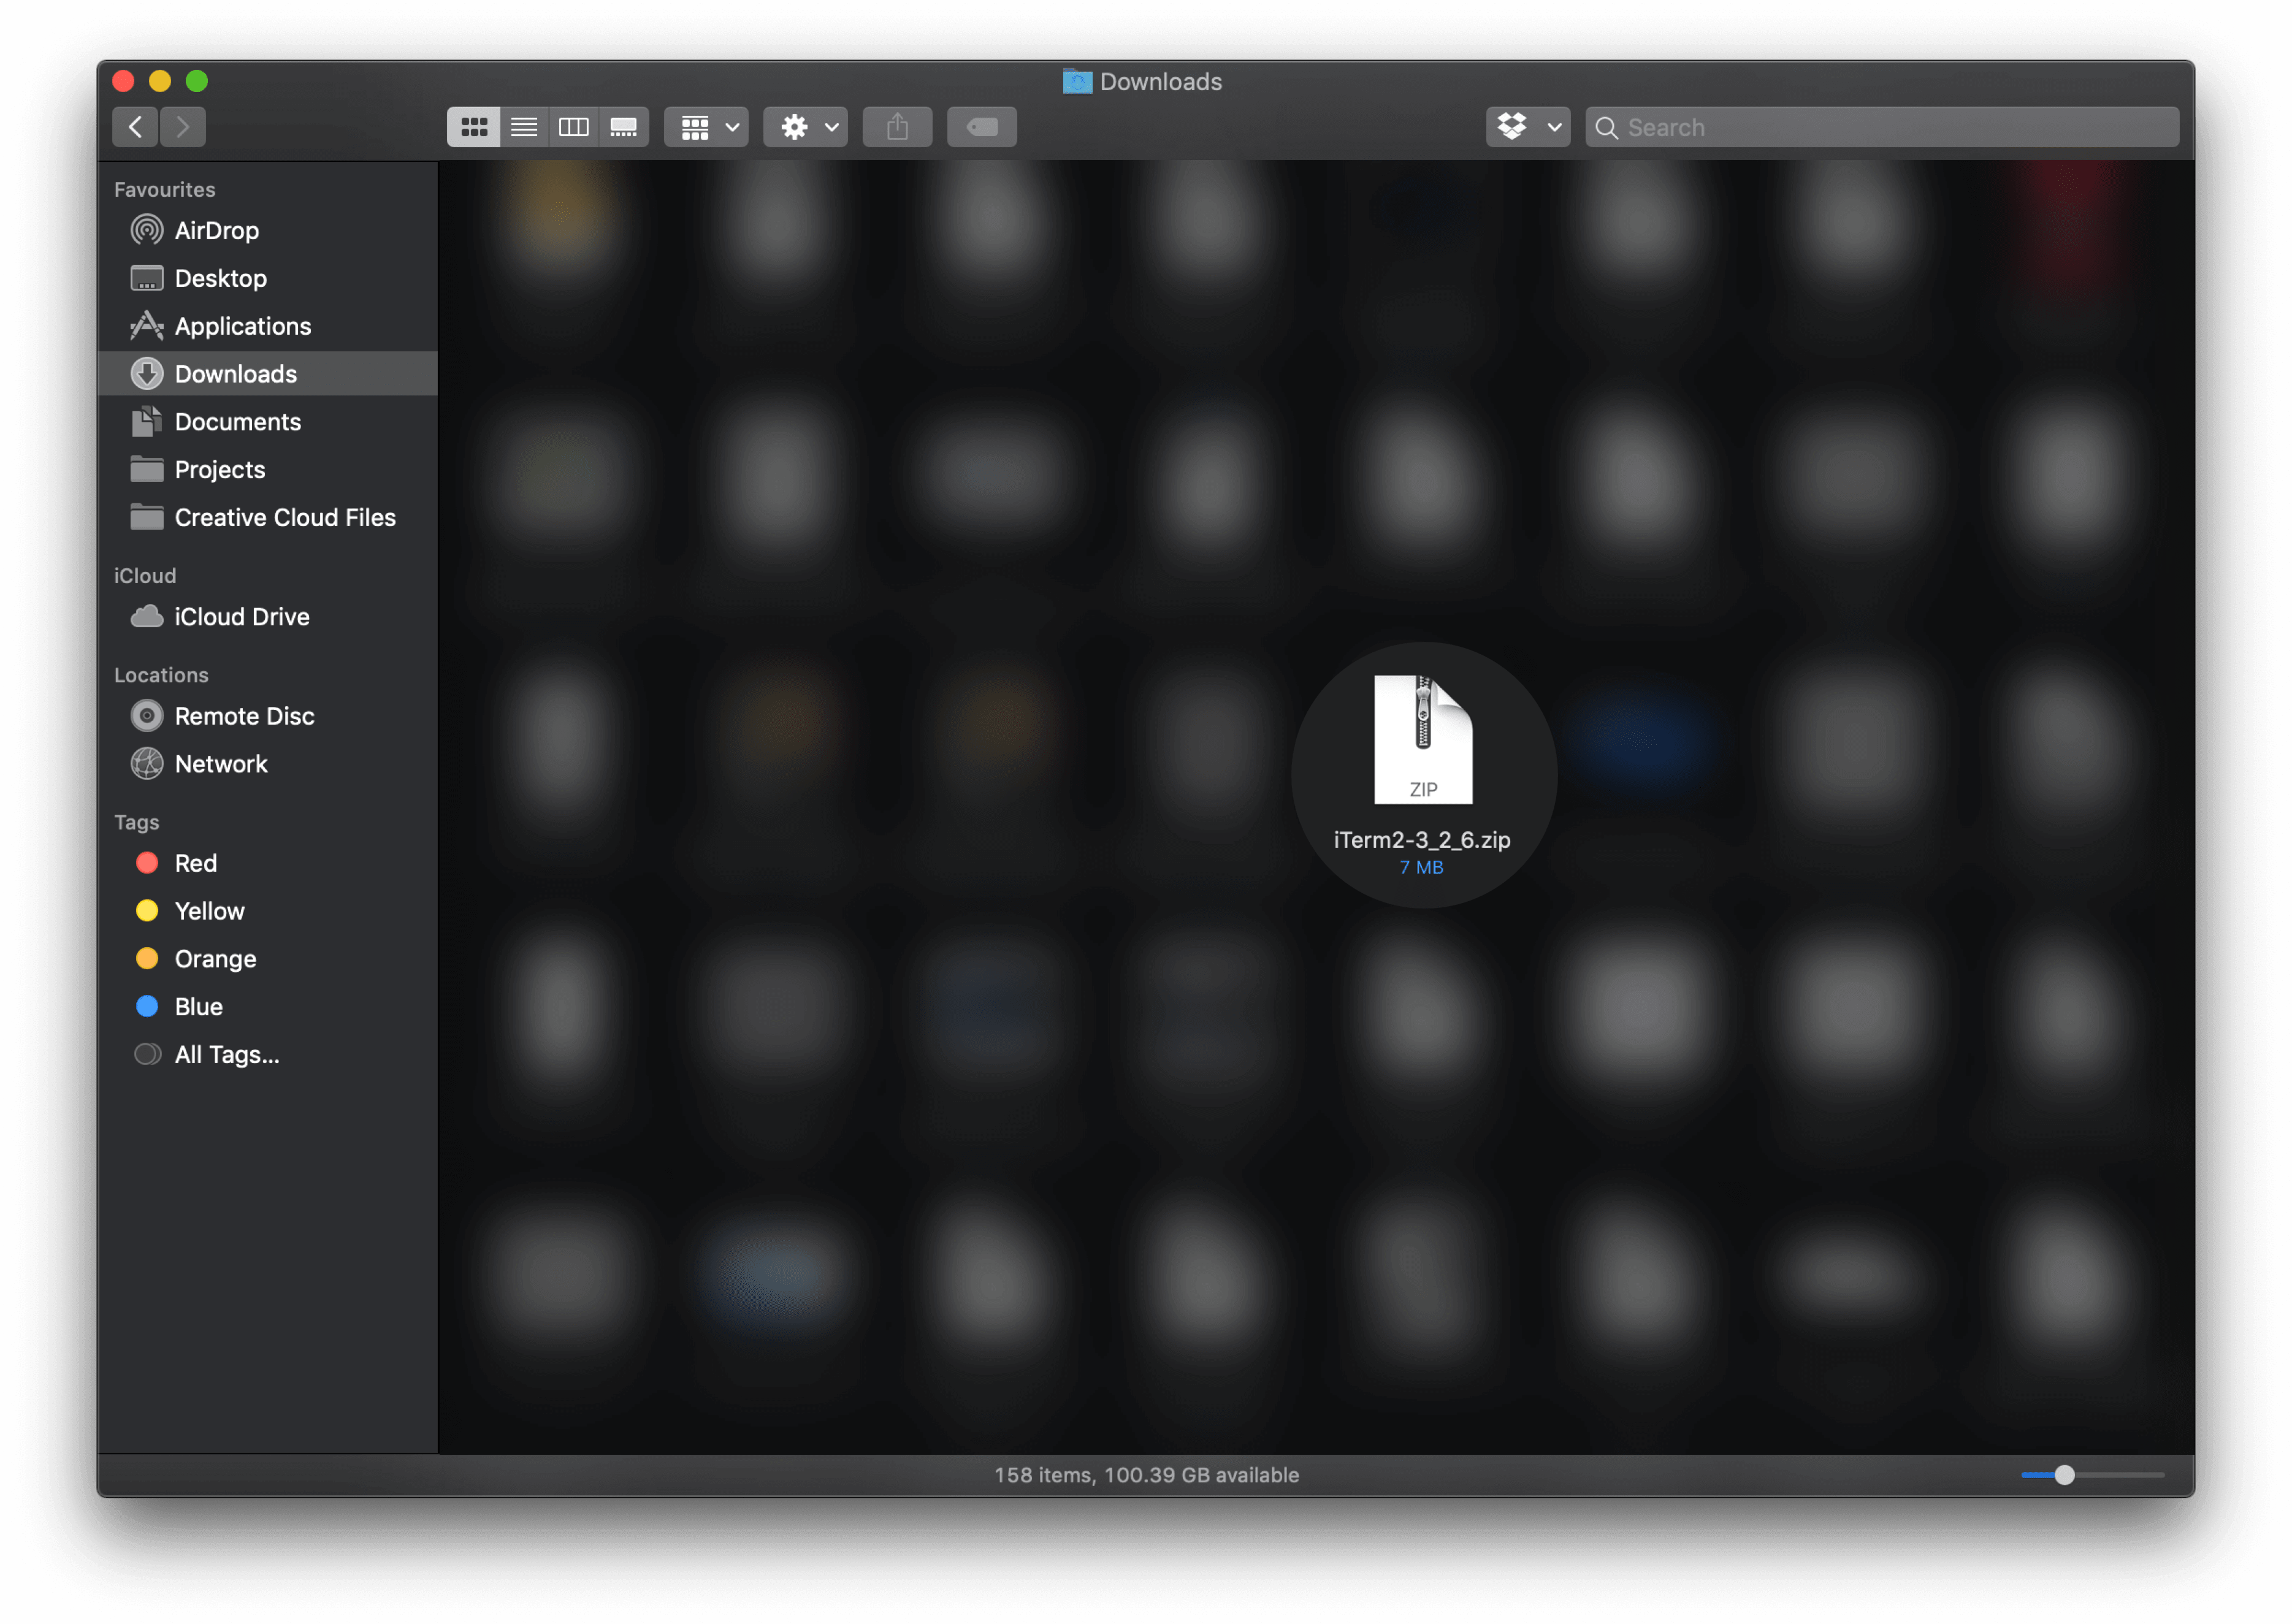
Unzip the downloaded file
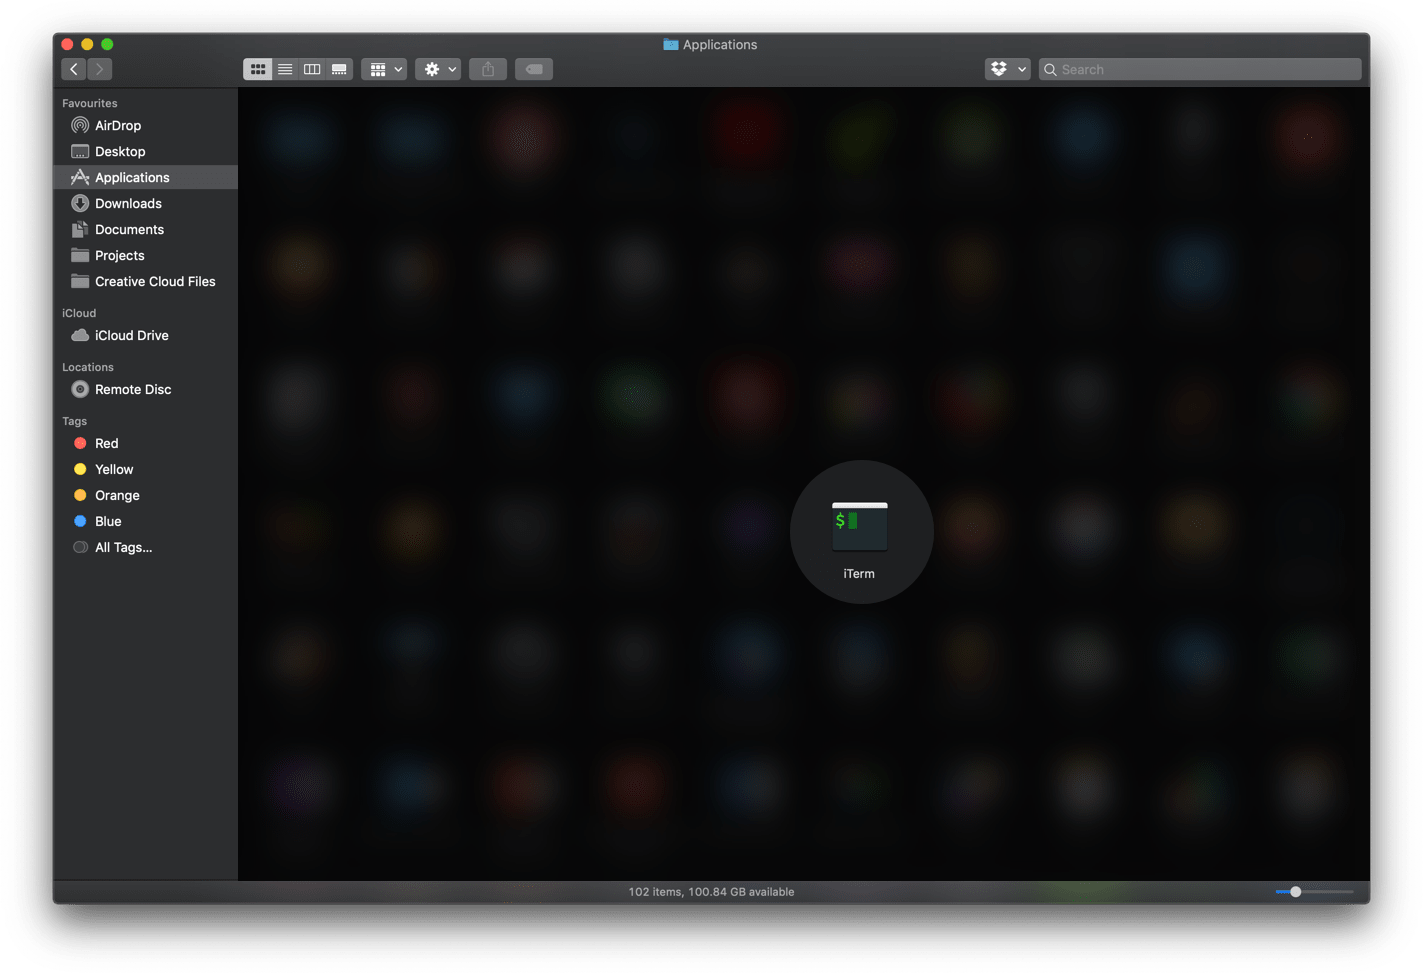
Move the unzipped iTerm application to the “Applications” folder and now from your Applications folder, double click the iTerm application to run it.
Note: You may have to provide Full Disk Access (which is a privacy option, a choice to make as per your liking) from your privacy section or when your iTerm application hints you to do so.